• Skip to main content
  • Skip to primary sidebar
life{in}grace

life{in}grace

live with more presence, passion, & purpose

  • Home
  • About
    • Contact
  • Work with Me
    • Courses
    • Life Mentoring School
    • LIVE Event – Your Best Beautiful Year – January 4, 2020
  • Natural Healing
    • Get Started
    • Essential Oil Resources
  • Free Resources
  • Podcast
  • Books

crafts

12 Days of Christmas:: Day 4 Anthropologie Inspired Candle {DiY}

November 5, 2012 by Edie Wadsworth 16 Comments

This is day 4 of 12 Days of {handmade} Christmas tutorials.  Bookmark the landing page for the whole 12 Days of {handmade} Christmas series and check daily for updates!
Patty, moi, Ruth{ie},  as I lovingly call her

You’re in for a treat today!  My friend Ruth from Living Well Spending Less is here to inspire us with her crafty skills!  Ruth and I feel like old friends.  We met at Blissdom in 2011 and then she made it possible for me to go in 2012.  She came to Bean Station in September to visit and crash my nerdy book club.  I wish we lived closer.   She’s such a wealth of information and inspiration.  Her 31 days series, which was preceded by crazy post on why she took all her kids’ toys away,  along with her unique perspective on couponing, all make me want to eek every last bit of information out of her.  I never feel like I have enough time to visit with her.  And we were lucky enough to spend the day with her and her awesome family while we were in Florida this weekend.  She was on local tv talking about her couponing adventures and we sat right by the pool and missed it.  Thank goodness for the videos!  I’m so thankful for her and know you’ll love getting to know her too!  Welcome, dearie!  And kiss the girlies for me:)

Anthropologie Inspired Candle {DiY}

I don’t know about y’all but Anthropologie is one of those stores I could spend all day just drooling over every single thing they sell in all its quirky, colorful, vintage-y (yes, that is totally a word) goodness. Most of the time I do manage to control myself, if for no other reason than I simply can’t bring myself to pay $25 for a candle. Not when I can make one that reminds me of Anthropologie for (almost) free using some Glade candles I picked up for next to nothing.

These fabric-covered candles were so fun and easy to make that I ended up making several to give as gifts, and now you can too. Here is what to do:

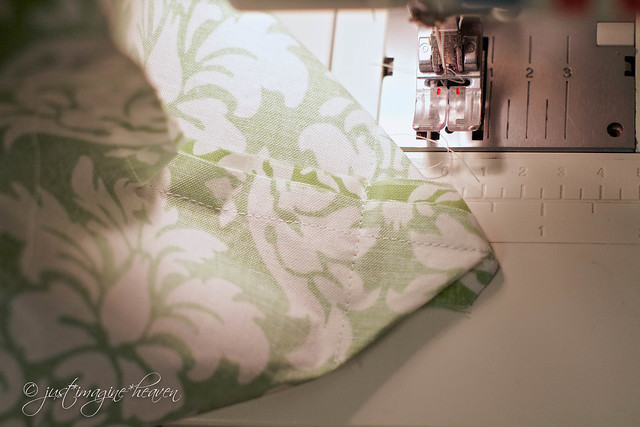
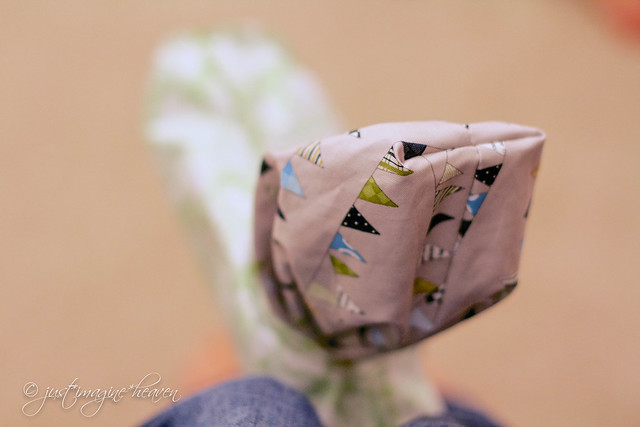
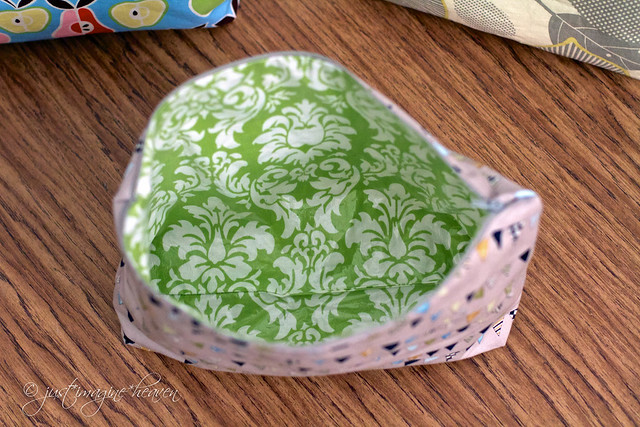
1. Trace a plate on the back of a pretty piece of scrap fabric, then cut out the circle.

2. Place a dab of tacky glue in the center of the circle, then place the candle over the glue and press down.

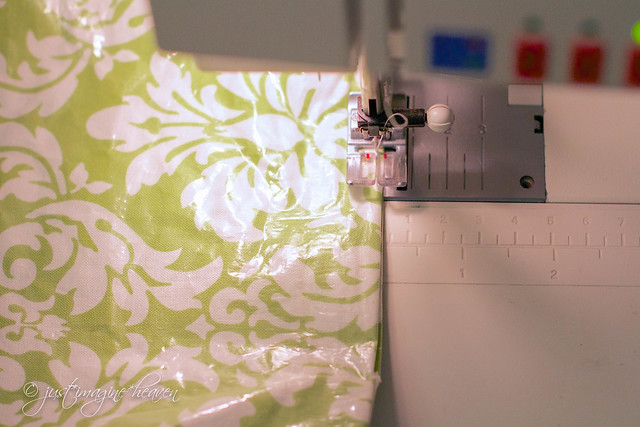
3. Make sure the candle is as centered as possible, and that the fabric is equal all the way around. Brush the fabric with a generous covering of Mod Podge.

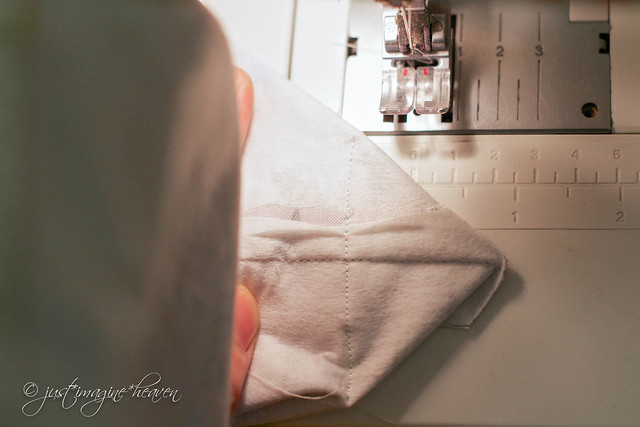
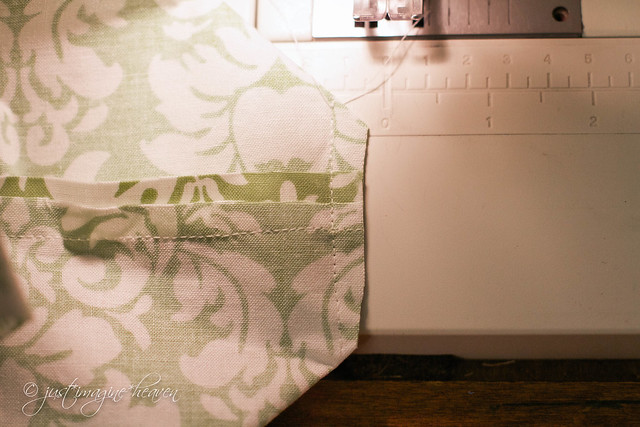
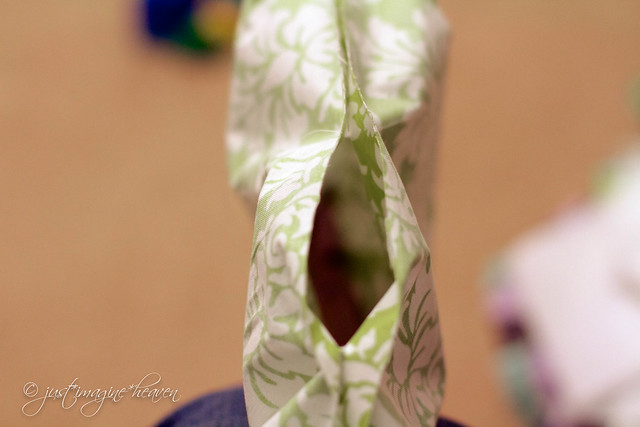
4. Flip the candle upside down, then bunch up the fabric so that it wraps around the candle. You could try pleating it in an even pattern; I kinda like the messy look. Brush over the top of the fabric with another generous coat of Mod Podge, making sure to get it in all the folds, then let it dry completely.

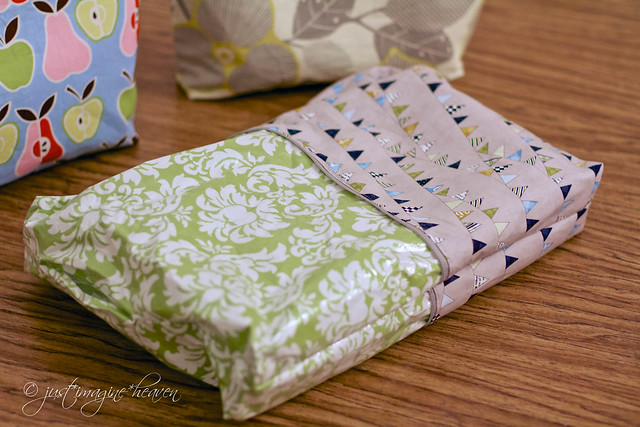
5. While the candle is drying, you can make the accent piece. Cut a small shape to coordinate with your fabric out of felt, carefully stitch the accent in a contrasting color, then hand stitch a button to the felt for extra cuteness.

6. When it is completely dry, glue a piece of coordinating ribbon around the top rim, wrap it with baker’s twine & secure it with more glue, then glue your accent piece over the end pieces. Voila! SO easy!


p.s. I feel so lucky to have received two of these in the mail from my sweet friend! They’re as cute in person as they look online! Hope you find time to make some.
xo,
edie

Filed Under: 12 Days of Christmas tutorials, crafts, DIY Tagged With: anthropologie inspired candle

12 Days of {handmade} Christmas Tutorials:: Day 3 Angel Pasta Ornaments

November 4, 2012 by Edie Wadsworth 12 Comments


This is day 3 of 12 Days of {handmade} Christmas tutorials.  Bookmark the landing page for the whole 12 Days series and check daily for updates!  Welcome Mary Beth, a mama, wife and teacher who blogs at the Broken Bohemian!


I’m the daughter of a veteran. A veteran preschool teacher, that is. She is one. crafty. lady. She also happens to be fearless when it comes to just going for it on crafty things. I, however, avoid being crafty because I am afraid of failure, too cheap to spend money and just generally lazy. But! My daughters, without knowing it, laid the craft smack down on me a few weeks ago. It went like this:

Girls: Mom, you’re Lali’s daughter, right?
Me: Yes, I sure am.
Girls: Mama, how come Lali is so crafty, and you’re her daughter, but you’re not crafty at all? Why don’t you ever do crafts with us like she does?
Me: *crickets*

So, I’m rolling up my sleeves and channeling my inner Martha and we’re having us an old fashioned, handmade Christmas holiday over here at Grace Cottage. We gave these angel ornaments as teacher gifts, tied to a little package of White Chocolate Nut Candy.


Here’s what you need:

Pasta: Rigatoni, Elbows and Bowties
Couscous (or tiny bird seed)
Glue gun AND craft glue
little wooden balls, 3/4 inch
thick metallic thread
metallic spray paint (I used Krylon ‘Champagne’)
small bowl
newspaper

Spread newspaper over your workspace. Use a hot glue gun to glue the ball to the top of the rigatoni. Then, hot glue two elbow noodles on the sides for arms. Pour 1/3 cup couscous in the small bowl. Cover the head with craft glue (in a hair pattern) and dip in the couscous to cover the glue. Let set on newspaper until the craft glue has mostly dried.

Next, cut a small length of thread (about 2 inches). Squirt a generous dot of hot glue on the angel’s back and press the ends of the thread in it, then press a bowtie on top. You want to place the bowtie up near the neck so she will hang upright.

The thread makes a ‘halo’ for the angel (sort of) but also gives you a spot to put a hook to hang the ornament.

Pull off any loose strings of hot glue. All that’s left to do is hit it with some spray paint! Be sure to spray from all angles, so you can get all the nooks and crannies.

Gloria in Excelsis Deo!

If you have little hands that want to ‘help’, you can have them sort through the pasta and remove cracked or broken pasta. They can also lay out little ‘sets’ of pasta for each angel in groups (one body, two arms, one bowtie) or hand you the wooden balls to glue on. They also really enjoy dipping the heads in the couscous!

Filed Under: 12 Days of Christmas tutorials, crafts

12 Days of Christmas Tutorials::Day 2 French Press Cozy

November 3, 2012 by Edie Wadsworth 5 Comments

This is day 1 of 12 Days of {handmade} Christmas tutorials.  Bookmark the landing page for the whole 12 Days of {handmade} Christmas series and check daily for updates!

Hello Life in Grace readers! I’m thrilled to have the opportunity to share my little french press cozy tutorial with you all today. My name is Kate, and I blog at Oh Write. I’ve been married for almost 10 years to the best man I could imagine God creating for me. Brett and I share our lives with our children Maren (4) and Truett (1). I spend most of my time being a wife and mother. In all the spare moments (ha!) I enjoy baking, reading, crafting, and spending time with friends.
I prefer my coffee made in a French press, but I don’t like how the coffee is cooled by the time I’m ready for a second cup. This little cozy helps to maintain the heat of the coffee while dressing up the French press itself. Let’s get started, shall we?
french press cozy tutorial
You will need:
2 elastic hairbands, 2 buttons, ribbon or other embellishments, fabric, flannel, silver heat-safe fabric, terry or other backing, needle and thread, sewing machine, and scissors. A straight-edge and rotary cutter will make the cutting much easier, but you could improvise if you don’t have those.


Begin by measuring your French press. Mine is a standard 8-cup Bodum press. I cut my fabric to 6 in. by 14.5 in. You could adjust the size of the fabric to fit your press. Cut pieces from the fabric, flannel, heat-proof fabric and terry.


Next, layer the front fabric (right-side-up) on top of the flannel and heat-proof fabric.


Now pin your ribbon to all three layers. Make sure to leave allowances for seams. (I use a generous 1/4 in. seam) I prefer the look of 2 ribbons. You could leave the ribbon off altogether, or use rick-rack, ruffles, or anything you’d like!


Next, you will sew down the edges of the ribbon on both sides. This will also secure the first 3 layers of the cozy together, which will make the rest of the assembly go smoothly.


Once the ribbon is secured, it’s time to attach the elastic bands. Keep in mind, the loop facing to the right in this picture is the part you will see. Be sure your loops are positioned so they will button through the handle of your press. (See how the cozy fastens onto the French press in the last picture.)


I sew over the elastic several times by back stitching. You want the elastic to be good and secure.


Now trim the string and snip the outer loops. Don’t cut too closely to the stitching, just enough to get rid of most of the excess. It should look like this:


Pin the terry to the other layers, right-sides-together.


It’s helpful to see the little tails of the elastic. You’ll back-stitch over those several times again, and this will help you ‘find’ them in order to do so. Sew around the cozy using generous 1/4 in. seams, leaving a 3 in. opening for turning.

Turn the cozy back to right-side-out. Be sure to carefully poke out the corners so they look nice and crisp. You could pin the opening together, but I usually just run the iron over it before sewing around the cozy.


Carefully sew around the edges, being sure to sew the opening closed.


This is what the almost-finished cozy will look like:


And, the front:


Line up the elastics and mark where your buttons need to go.


Using your trusty needle and thread, attach the buttons.


All ready for some coffee to warm!


Ahhh…nice and cozy!


 Another version…


And…the one I kept for myself!


Happy sewing…and Merry Christmas!


Filed Under: crafts, sewing, tutorials

12 Days of {handmade} Christmas ::Day 1 Large Zippered Make-up Bag

November 1, 2012 by Edie Wadsworth 46 Comments

 Welcome to 12 Days of  Handmade Christmas!

zipperedmakeupbag

There’s no rest for the weary.  I just finished my 31 days to a heart of hospitality and here we go again!  But I have some awesome projects lined up for you to help us all embrace a more meaningful, less commercialized Christmas.  This is day 1 of 12 Days of {handmade} Christmas tutorials.  Bookmark the landing page for the whole 12 Days of {handmade} Christmas series and check daily for updates! I’m so excited that my adorable friend, Camera Jan, blogger at Just Imagine Heaven, and homeschooling MOTHER OF 6! is gonna start the series for us.  Here’s how it happened.  She and Heather both brought these AH-mazing large zippered make-up bags on our trip to Texas.  I instantly coveted them and made her promise to do a tutorial so I could make a few for Christmas presents and of course, one to keep for myself!  I have some perfect fabric for this occasion and can’t wait to find a little time to sneak up to the sewing room.  And make sure you check out the great projects from 2010!   Welcome dearie!  Thank you for being so willing to share your hard work and creativity with us!  Mwahhhhh:))))

My sweet friend, Edie (Long live Texas!) has asked me to do a little tutorial for my super versatile cosmetic bag. With Christmas just around the corner y’all better get started on these ASAP. They will make wonderful gifts!

Often times I have things in my head that I would love to make, but then I’m stuck without a pattern. I’ve been thinking of making an EXTRA large cosmetic case for awhile now. They’re fabulous for travel or even just to carry things in a diaper bag or even to keep in a glove box. You never know when it might come in handy. With a few friends’ birthdays coming I figured it would be the perfect time to get moving on this project. I began browsing Pinterest with no success, so after a little trial and error I came up with this pattern.

_MG_9340.jpgI have a friend that loves buntings, so when I saw this fabric I couldn’t passs it up. That fabric, on top, will be used for the outside of your bag. The bottom, green fabric, will be on the inside.

_MG_9341.jpgWhat makes this bag unique is that I’ve lined it with vinyl, so it’s easy to wipe clean or you can use it for wet things and the outside won’t get wet..

31woFGpfw-L._SY450_For the vinyl I just used this iron on stuff. Thermoweb Heat’n Bond Iron-On Vinyl -17″X5 Yards Gloss
It’s pretty dreamy and easy to use. Now I just want to iron this vinyl to everything because I have 6 kids and it would make cleaning a lot easier.
I love it!_MG_9342.jpgHere’s where things may get a little tricky, so hopefully I don’t lose you and I don’t confuse myself. First, you will want to iron heavyweight interfacing to the wrong side of your bunting fabric. It will give your bag more stability. (This step is not pictured.) Next, lay your outer fabric right side up and your zipper face down on top of it.

_MG_9346.jpgThen take your lining fabric and lay it face down on top of the zipper, which is also face down. Then you are going to sew along the edge of the zipper. This is where a zipper foot really comes in handy.

_MG_9349.jpgAfter you’ve sewn these pieces together, open it up and this is what it looks like.

_MG_9350.jpgIron your fabric along the zipper, but be careful not to get the hot iron on the vinyl. That could be detrimental to the project.

_MG_9352.jpgNow repeat the above steps with the other fabric pieces and other side of the zipper.

_MG_9354.jpgThis is what it looks like when both sides have been sewn. If you turn the bag over you will have the green pieces laying right side out. Got it?

_MG_9356.jpgCarefully edge stich along the zipper on both sides, making sure the vinyl undernath is not part of the edge stitiching.

_MG_9358.jpgOpen the zipper halfway. Don’t forget this step or you’ll be sorry later.

_MG_9359.jpgNow lay your bag so that the right sides of all fabric pieces are facing inward. It should be green on green and bunting on bunting. Pin the edges together. Then sew along the outside edge with a 1/2 inch seam allowance. Be sure to leave about a 2 inch opening at the bottom center of the green fabric. That is where you will be turning the bag inside out.

_MG_9362.jpgClip all four corners.

_MG_9365.jpg
Here’s another tricky part. This is how we make the bag stand on its own. At the corners of the bag, on all for sides, match the side seam with the bottom seam. It should form a triangle.

_MG_9364.jpgSmash it down and sew along the edge with a 2 inch seam allowance.

_MG_9366.jpg You are going to do this on all four sides.

_MG_9370.jpgThen trim the edges. It’s always hard for me to cut these corners off, but it’s got to be done. If they aren’t cut off things will be a little puffy later. And, we definitely don’t want that.

_MG_9372.jpgRemember that opening you left at the bottom of the bag? Now it’s time to utilize it. We’re going to turn this bag inside out now!

_MG_9374.jpgI like to stick one of the farthest corners through the hole first and then work the rest of the bag through the hole.

_MG_9377.jpgThere! Everything is now right side out.

_MG_9379.jpgNow we need to sew up that opening at the bottom of the bag. You can sew this by hand for a more polished finish or you can do it the lazy way, like me, by using the sewing machine.

_MG_9381.jpgOnce that is finished you can tuck the inside back into the bag and you’re finished!

_MG_9386.jpgSee? Pretty easy peasy, right? Now go and make a hundred more and give them to your friends for Christmas!

Materials:
  • 1-12 inch zipper
  • 2-14×10 inch pieces of heavyweight fusible interfacing
  • 2-14×10 inch pieces of outer fabric
  • 2-14×10 inch pieces of inner fabric
  • 2-14×10 inch pieces iron on vinyl
Directions:
  1. Fuse interfacing to outer fabric pieces and iron vinyl to inner fabric pieces.
  2. Lay outer fabric right side up. Place zipper face down on top of outer fabric. Place inner fabric wrong side up on top of zipper. Sew along the edge of the zipper with a zipper foot.
  3. Repeat on step 2 on other side of zipper.
  4. Iron outer fabric along the zipper. Then edge stitch along the zipper, careful not to sew the green fabric.
  5. Turn bag inside out, so right sides of outer fabric are facing each other and right sides of inner fabric are facing each other. Unzip zipper halfway.
  6. Pin edges and sew along the outside of the bag with 1/2 inch seam allowance, leaving a 2 inch opening at the bottom center of the inner fabric for turning, later. Trim all 4 corners.
  7. Match side seams with bottom seam creating a triangle. Sew the triangle with a 2 inch seam allowance. Trim the excess seam allowance.
  8. Turn bag inside out through opening at the bottom of the bag. Sew opening closed.
  9. Tuck inside of bag into bag. Finished!

_MG_9389.jpg

_MG_9647.jpgDo you want an idea how ginormous this bag really is? That’s my 4 year old, holding the bag, filled to the gills with awesomeness.

_MG_9637.jpgWhen I travel, I don’t travel light when it comes to toiletries and cosmetics. I want to have as much of of things with me as a I can. You never know when you might need for different occasions. It’s best to be prepared. (On a side note, the pink Beauty Blender is awesome. Get one. Once you have one you’ll wonder how you lived without one for so long.)

_MG_9633.jpgYes! It all fits into the cosmetic bag. It also zips. Now you’ll notice that it isn’t completely full. There’s room for more. Perhaps I’ll add a toothbrush and some toothpaste since it seems I forgot to add them to the photo.

_MG_9641.jpgNow you’re thinking, “Toiletries and cosmetics. Big deal.” Right? How about 6 swimming suits? That’s right.

_MG_9646.jpgThis bag is great for wet bathing suits. I fit all 6 of my children’s swim wear into that bag. It’s perfect if you’re at a hotel or somewhere that makes it difficult to store wet items.

_MG_9648.jpgElizabeth can hardly contain the excitement over the versatility of this ginormous bag! Now you really need to make a few for yourself and your friends.

Filed Under: 12 Days of Christmas tutorials, crafts, DIY, sewing, tutorials Tagged With: diy large makeup bag

calling all crafters

September 13, 2012 by Edie Wadsworth 17 Comments


i decided  for sure today.
i’m gonna do it again.

{12 days of handmade christmas}

is back.

the first twelve days of november.

perfect timing for your to find some projects that are doable by Christmas.
sooooo,
if you’re crafty or know someone who is and would like to submit a tutorial,
send me an email or leave me a comment on this post.  (examples of past tutorials below!)
i’ll pick the projects that are fairly simple and can be made in a couple of hours
and post the tutorials on my blog.

i didn’t do the 12 days last year because it was kind of a rough year.

but i’m back, baby.

i’d like to have all the tutorials sent to me by the middle of October and if we have more submissions than we have days, we’ll post them to lifeingracegirls.

{by the way, my dear friend Marie is posting to lifeingracegirls today so go give her some love and check out her blog at The (not always) Lazy W—and let me know if you’ve got a post you’d like to share with the lifeingrace community and we’ll get it posted over there!}

i’d also like to link to your favorite etsy shops so we can support moms who are creating lovely handmade goodies.

so tell me about those too.  pretty please?

if you guys don’t come through for me and we only get 5 days worth of postings , i’ll resort to posting seven days videos of  me singing old school country songs.

that could be devastating for us all.

i’d much rather learn how to make  a dishmat, wouldn’t you?

yes you would, trust me.  or ask my children.

i can’t wait to hear about all your handmade goodness!

please send your emails to ediewadsworthatmacdotcom and put ’12 days of Christmas’ as the subject or leave a comment on this post.

my hot glue gun and sewing machine thank you in advance.

here’s a sampling of the projects from 2010.

Dishmat Tutorial

Crayon Roll

Zippered Pouches

Appliqued Placemats

Camera Strap

Embellished Dishtowels

Bean Bags

Alphabet Crayons

Silhouettes

Rosette Wreath

Picnic Blanket

also, I’m working on a series for October hosted by my very gracious friend The Nester called ’31 Days to a Heart of Hospitality’.  Last year, I posted every day in October on the rebuild of our house so this year, I’m expanding on that theme as I explore what it means to show hospitality ,why we should care, and some practical advice on turning the idea into reality.   (The posting every day makes me break out into hives but maybe I can manage!)  You should join too!  She’s even so kind as to provide templates for making the buttons.  She thinks of everything because she’s awesome like that.

Filed Under: confessions, crafts

DIY woman silhouette art

April 10, 2012 by Edie Wadsworth 16 Comments

woman silhouette artI hope you had a wonderful Easter weekend.  I’m still basking in the joys and trying to recover!
I’m working on a marathon post in which I tell you all the minutiae of my life. I know you’ll be waiting on pins and needles.  It’s riveting stuff.
Now back to ‘woman silhouette art’.
I saw almost this exact thing in Franklin, TN when I was in Nashville for the Pearl Event.
It was nearly $300 and I knew it wouldn’t be that hard to duplicate.
Then as luck would have it, we were able to get silhouettes done at Disneyland when we there in March.
It was the perfect storm for my book page, woman silhouette, DIY project.
I bought a 24″x 36 in frame at Hobby Lobby with my 40% off coupon which made the frame $25.
I bought the foam board there too for less than $10 and then had the silhouette enlarged to an 11×14 size.


I found some cute girls willing to decoupage all the book pages onto the foam board and they even thought it was big fun.
We didn’t have any real specific rules for the book pages except they all had to overlap.

It took less than an hour, cost less than $40 and turned out so darn cute.
Now I want to decorate the whole room with book pages just like my friend Nester.
woman silhouette

Filed Under: crafts, DIY Tagged With: woman silhouette art

  • « Go to Previous Page
  • Go to page 1
  • Go to page 2
  • Go to page 3
  • Go to page 4
  • Go to page 5
  • Go to page 6
  • Go to Next Page »

Primary Sidebar

ediewadsworth

Coach. Healer. Life Mentoring School.
💕💕I help women heal & rediscover their purpose & calling.💕💕 Click below for my free purpose field guide!

Dr. Edie Wadsworth|Lifeingrace
2 years ago today, your world shattered into a mil 2 years ago today, your world shattered into a million pieces.

Sometimes I marvel at how we were blessed enough to be there holding you when it all came crashing down. I do know this—I can’t remember my life without you.

I do know that thousands of tears and meals and boo-boos and toy trucks later, we stand in awe of you---your courage, your brave big boy fight, your tender little boy heart, your hilarious old man ways. 

We know how sacred this walk with you is and we don’t take it lightly.

We are here for it all and we couldn’t be more grateful.

We have always loved you and you have always been our special gift.

 Love you little one. Let’s keep listening for Aslan. He will find a way to put everything back together. 

“Herein lies the world. Beautiful and terrible things will happen. Do not be afraid.”
Hiring these two out for all your ring bearer and Hiring these two out for all your ring bearer and flower girl needs.  They provide ample entertainment to your guests and accept plush toys for payment in lieu of money. May or not be VERY strong willed.  And also adorable. @williamsperformance @ginawilliamsh @ameliadurand4
I turned 51 last week and spent a much needed few I turned 51 last week and spent a much needed few days alone with this guy.  As soon as we drove out of the driveway I started crying. I don’t think I realized how much I needed a break.

it was incredible and relaxing and amazing and so life-giving. 

this week it feels like last week was 100 years ago because you know, life. 

I am excited to say that despite the fact that I’m another year older I managed to figure out how to go live on YouTube with my new camera. It only took me approximately 6000 hours. So maybe you’ll join me at noon today on YouTube and we’ll try something new together.

Here’s to 2021. Maybe it will get its act together but if it doesn’t we will get ours together😂🥳❤️❤️❤️
“To have Faith in Christ means, of course, tryin “To have Faith in Christ means, of course, trying to do all that He says. There would be no sense in saying you trusted a person if you would not take his advice. Thus if you have really handed yourself over to Him, it must follow that you are trying to obey Him. But trying in a new way, a less worried way. Not doing these things in order to be saved, but because He has begun to save you already. Not hoping to get to Heaven as a reward for your actions, but inevitably wanting to act in a certain way because a first faint gleam of Heaven is already inside you.”
― C.S. Lewis, Mere Christianity
Got my halo yesterday🤩😇😂 (That ridge lin Got my halo yesterday🤩😇😂

(That ridge line right above my head is the infamous Angel’s Landing)

Here’s to climbing out of tough spots in 2021❤️
What I learned in 2020?? I am HERE FOR ALL THE L What I learned in 2020?? 

I am HERE FOR ALL THE LOUNGE WEAR. 

Amen. Goodnight. 🤩🤩🥳🥳🥳 

Okay fine. Currently sporting sweater from Target which I have worn everyday for 3 months.  Natori PJ’s which I HIGHLY recommend, and Ugg slippers which I’ve worn everyday for a solid year. 

How’s your lounge wear game?? Tell me everything.
Day 2 of LIVE YOUR DREAM starts in 30 min. We’ll Day 2 of LIVE YOUR DREAM starts in 30 min. We’ll be talking all about DESIRE and the difference between false desire and true desire and how true desire leads us to our calling. 

It’s not too late to join us and if you could see the comments inside this group, you would 😭😭😭 and 🥳🥳🥳 because we are getting to the heart of things and it’s only gonna get better! 

If you’re already in, tell us how yesterday’s training impacted you and if you’re not, JOIN US FRIENDS!!

Head over to https://lifeingraceblog.com/dream
We took Tommy boy for this first ski adventure tod We took Tommy boy for this first ski adventure today and it was so satisfying to see him tackle something hard and keep his chin up and have a BALL doing it.

He was very entertaining to his ski school friends, despite the fact that his German instructor couldn’t understand a WORD he said. 😂🥳

But all you mamas out there can see through all the pretty pictures and videos to know that days like today can also be full of frustration.

Making sure everybody has their stuff, the reservations, the snacks, the HASSLE of boots and poles and gloves and skis, the tears, the snappy replies, the hurt feelings, the wrong turns, the missed moments, the potty breaks.

NEED I GO ON??????

But then there’s the down to your soul goodness of being smack dab in the middle of God’s glorious creation, the sheer joy of the wind and sun on your face, the fleeting feeling that everything is right in the world, the triumph of tackling something hard and pushing through all the doubt and fear.

I felt every emotion today. What a privilege to live this life we’ve been given. What grace to live it with these people.

Today was a dream. But like every dream come true, it has a cost, it requires more of you than you think it will. You will want to quit.  A million times.  But what waits for you on the other side is worth fighting for. 

That’s what we’re diving into this week in my online workshop LIVE YOUR DREAM.

You may have given up on setting goals, but don’t stop dreaming.

Come dream with us and let’s make 2021 the year we were willing to be so alive that we would risk feeling EVERY emotion, every setback, every failure in order to see it come true.

We start tomorrow.

It won’t be the same without you.

Join us at https://lifeingraceblog.com/dream.

It’s time to dream again.
❤️❤️❤️❤️❤️❤️

What’s one thing you’re dreaming about this year???
It was magical. ⛄️⛄️⛄️ Know what’s It was magical. ⛄️⛄️⛄️

Know what’s more magical for me???? The week between Christmas and the new year and I’ve made it even more epic by hosting an online workshop called LIVE YOUR DREAM🥳🥳🥳🥳

This one is for the dreamers and the doers!! Join me at lifeingraceblog.com/dream and let’s make some magic❤️❤️❤️❤️

Tell us in the comments if you’re already in!!!
  • Facebook
  • Instagram
  • Twitter

© Copyright 2008-2019 life{in}grace · All Rights Reserved · Graphic Design by Jenna Riccio Laible · Website by Erin Ulrich