
Welcome to 12 Days of Handmade Christmas!
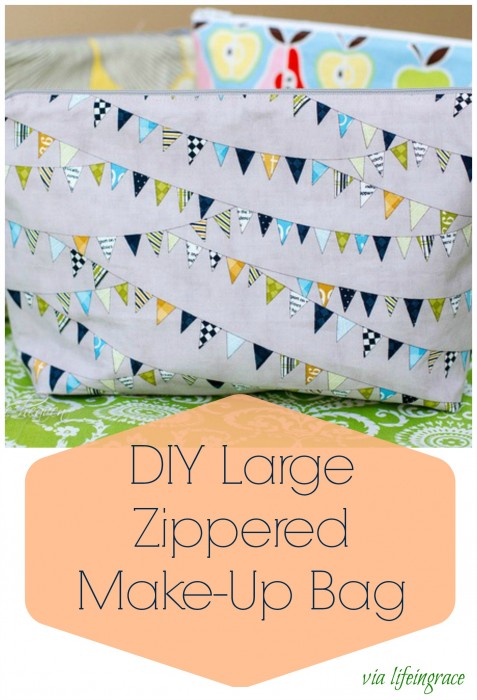
There’s no rest for the weary. I just finished my 31 days to a heart of hospitality and here we go again! But I have some awesome projects lined up for you to help us all embrace a more meaningful, less commercialized Christmas. This is day 1 of 12 Days of {handmade} Christmas tutorials. Bookmark the landing page for the whole 12 Days of {handmade} Christmas series and check daily for updates! I’m so excited that my adorable friend, Camera Jan, blogger at Just Imagine Heaven, and homeschooling MOTHER OF 6! is gonna start the series for us. Here’s how it happened. She and Heather both brought these AH-mazing large zippered make-up bags on our trip to Texas. I instantly coveted them and made her promise to do a tutorial so I could make a few for Christmas presents and of course, one to keep for myself! I have some perfect fabric for this occasion and can’t wait to find a little time to sneak up to the sewing room. And make sure you check out the great projects from 2010! Welcome dearie! Thank you for being so willing to share your hard work and creativity with us! Mwahhhhh:))))
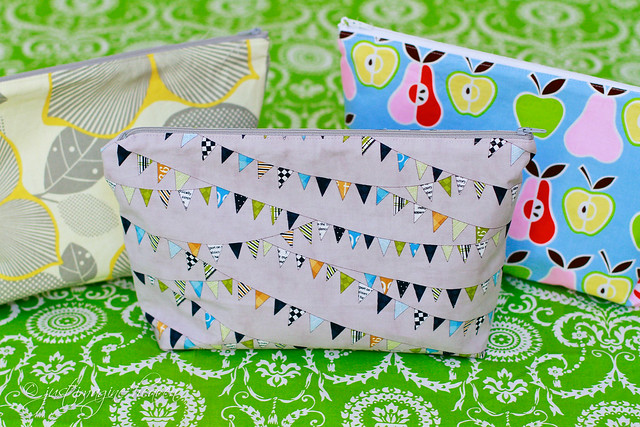
My sweet friend, Edie (Long live Texas!) has asked me to do a little tutorial for my super versatile cosmetic bag. With Christmas just around the corner y’all better get started on these ASAP. They will make wonderful gifts!

Often times I have things in my head that I would love to make, but then I’m stuck without a pattern. I’ve been thinking of making an EXTRA large cosmetic case for awhile now. They’re fabulous for travel or even just to carry things in a diaper bag or even to keep in a glove box. You never know when it might come in handy. With a few friends’ birthdays coming I figured it would be the perfect time to get moving on this project. I began browsing Pinterest with no success, so after a little trial and error I came up with this pattern.
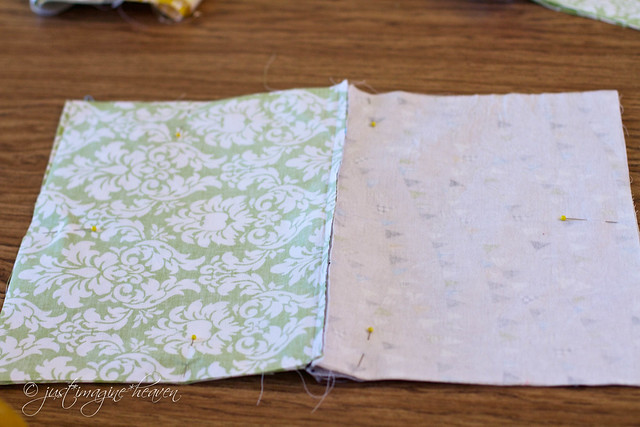
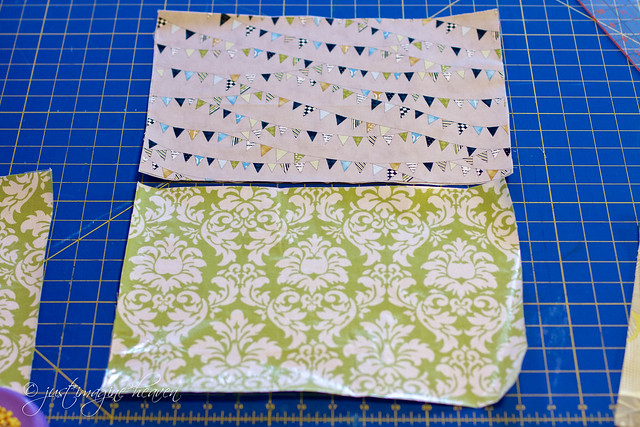 I have a friend that loves buntings, so when I saw this fabric I couldn’t passs it up. That fabric, on top, will be used for the outside of your bag. The bottom, green fabric, will be on the inside.
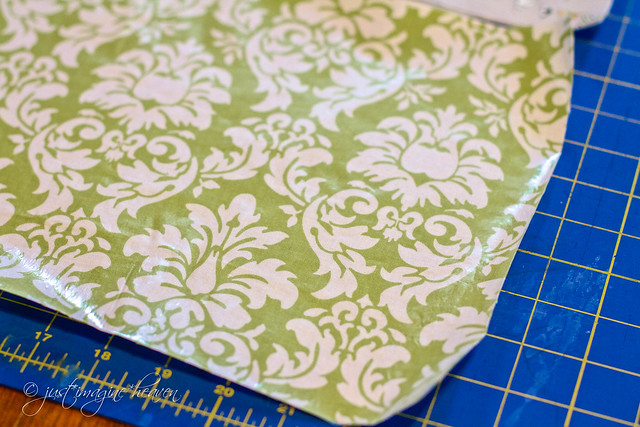 What makes this bag unique is that I’ve lined it with vinyl, so it’s easy to wipe clean or you can use it for wet things and the outside won’t get wet..
 For the vinyl I just used this iron on stuff. Thermoweb Heat’n Bond Iron-On Vinyl -17″X5 Yards Gloss
It’s pretty dreamy and easy to use. Now I just want to iron this vinyl to everything because I have 6 kids and it would make cleaning a lot easier.
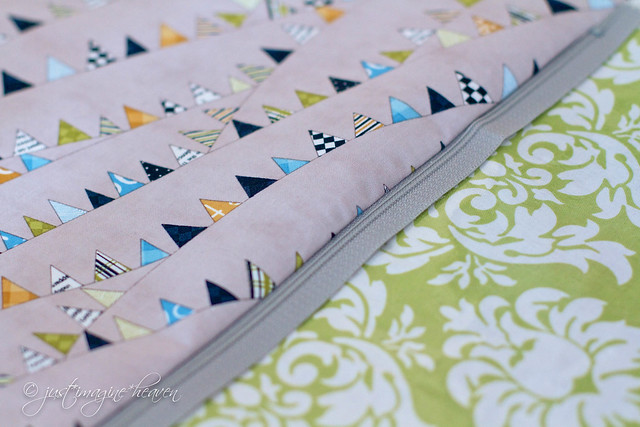
I love it! Here’s where things may get a little tricky, so hopefully I don’t lose you and I don’t confuse myself. First, you will want to iron heavyweight interfacing to the wrong side of your bunting fabric. It will give your bag more stability. (This step is not pictured.) Next, lay your outer fabric right side up and your zipper face down on top of it.
 Then take your lining fabric and lay it face down on top of the zipper, which is also face down. Then you are going to sew along the edge of the zipper. This is where a zipper foot really comes in handy.
 After you’ve sewn these pieces together, open it up and this is what it looks like.
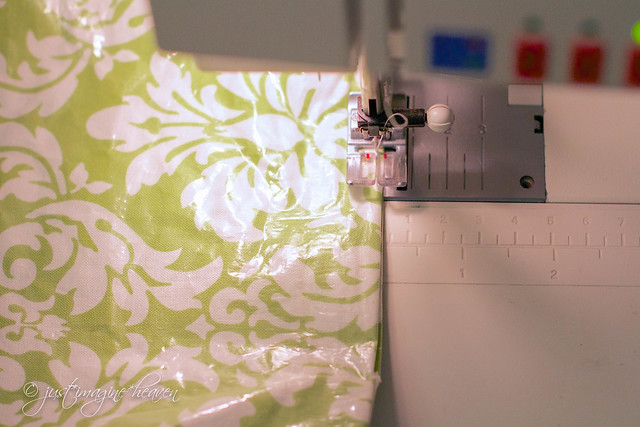
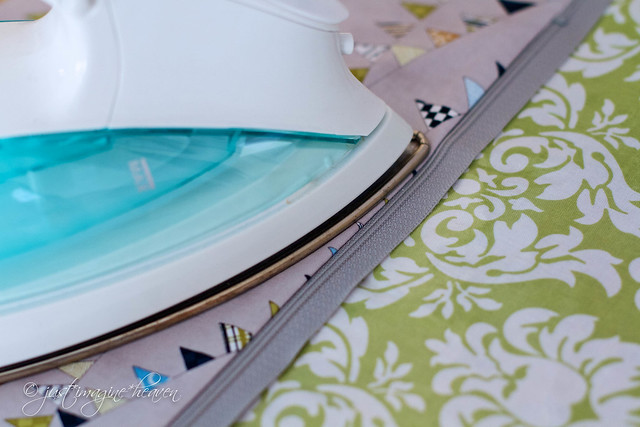 Iron your fabric along the zipper, but be careful not to get the hot iron on the vinyl. That could be detrimental to the project.
 Now repeat the above steps with the other fabric pieces and other side of the zipper.
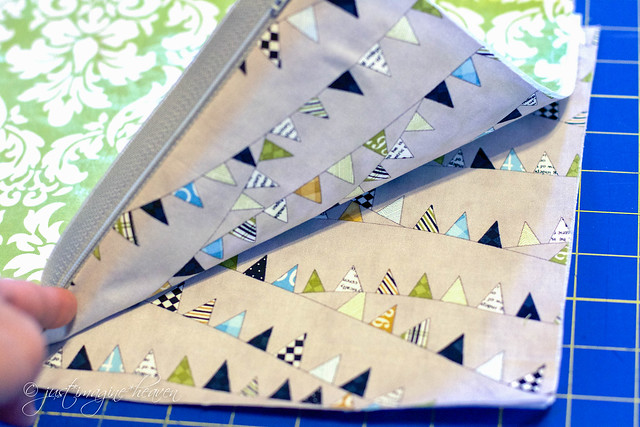
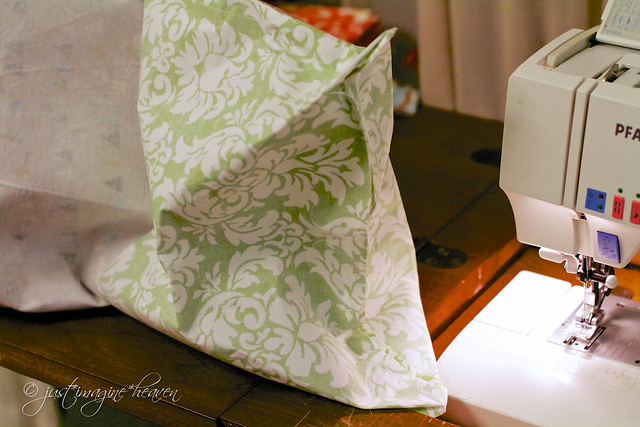
 This is what it looks like when both sides have been sewn. If you turn the bag over you will have the green pieces laying right side out. Got it?
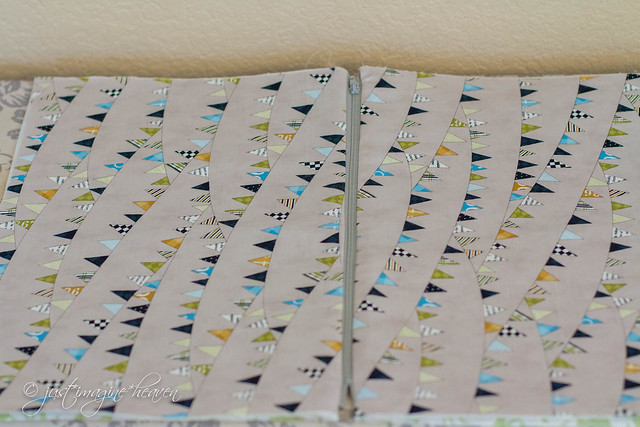
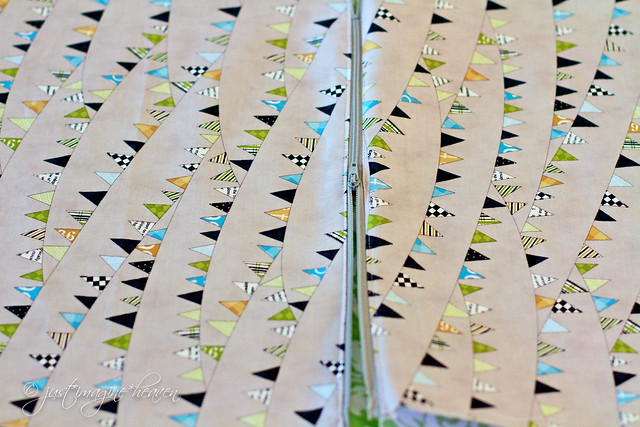
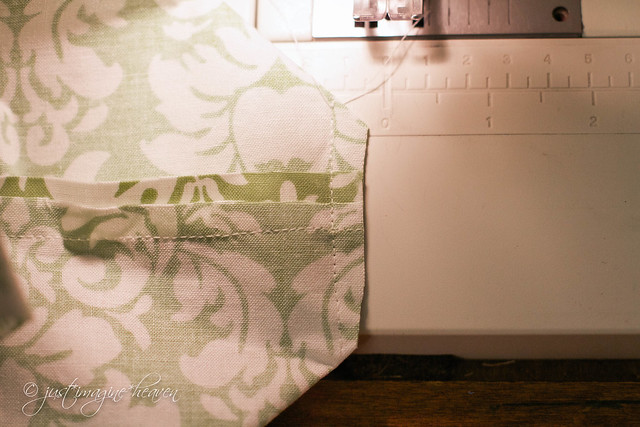
 Carefully edge stich along the zipper on both sides, making sure the vinyl undernath is not part of the edge stitiching.
 Open the zipper halfway. Don’t forget this step or you’ll be sorry later.
 Now lay your bag so that the right sides of all fabric pieces are facing inward. It should be green on green and bunting on bunting. Pin the edges together. Then sew along the outside edge with a 1/2 inch seam allowance. Be sure to leave about a 2 inch opening at the bottom center of the green fabric. That is where you will be turning the bag inside out.
 Clip all four corners.
Here’s another tricky part. This is how we make the bag stand on its own. At the corners of the bag, on all for sides, match the side seam with the bottom seam. It should form a triangle.
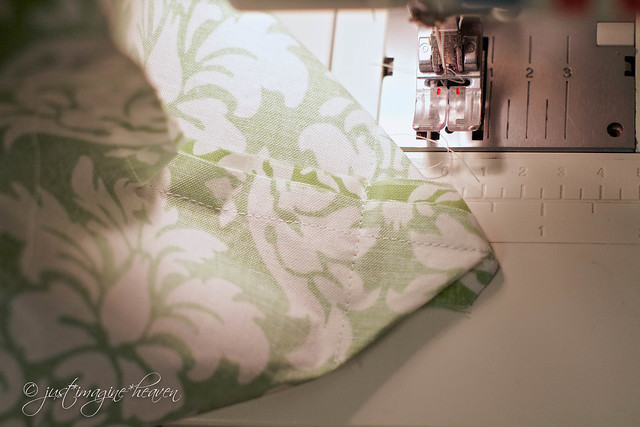 Smash it down and sew along the edge with a 2 inch seam allowance.
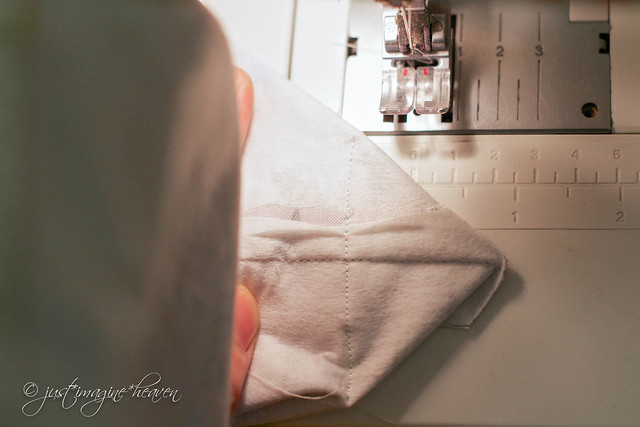 You are going to do this on all four sides.
 Then trim the edges. It’s always hard for me to cut these corners off, but it’s got to be done. If they aren’t cut off things will be a little puffy later. And, we definitely don’t want that.
 Remember that opening you left at the bottom of the bag? Now it’s time to utilize it. We’re going to turn this bag inside out now!
 I like to stick one of the farthest corners through the hole first and then work the rest of the bag through the hole.
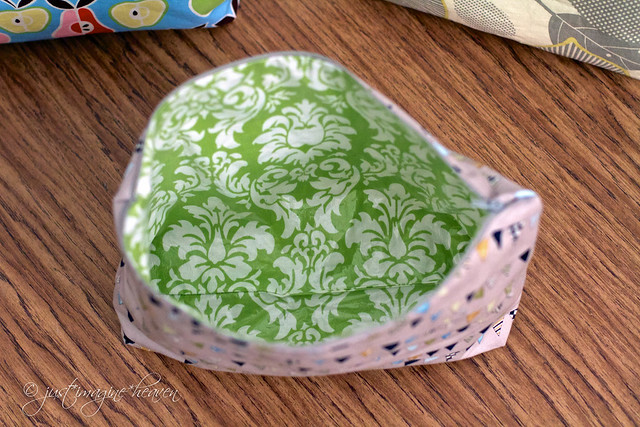
 There! Everything is now right side out.
 Now we need to sew up that opening at the bottom of the bag. You can sew this by hand for a more polished finish or you can do it the lazy way, like me, by using the sewing machine.
 Once that is finished you can tuck the inside back into the bag and you’re finished!
 See? Pretty easy peasy, right? Now go and make a hundred more and give them to your friends for Christmas!
- 1-12 inch zipper
- 2-14×10 inch pieces of heavyweight fusible interfacing
- 2-14×10 inch pieces of outer fabric
- 2-14×10 inch pieces of inner fabric
- 2-14×10 inch pieces iron on vinyl
- Fuse interfacing to outer fabric pieces and iron vinyl to inner fabric pieces.
- Lay outer fabric right side up. Place zipper face down on top of outer fabric. Place inner fabric wrong side up on top of zipper. Sew along the edge of the zipper with a zipper foot.
- Repeat on step 2 on other side of zipper.
- Iron outer fabric along the zipper. Then edge stitch along the zipper, careful not to sew the green fabric.
- Turn bag inside out, so right sides of outer fabric are facing each other and right sides of inner fabric are facing each other. Unzip zipper halfway.
- Pin edges and sew along the outside of the bag with 1/2 inch seam allowance, leaving a 2 inch opening at the bottom center of the inner fabric for turning, later. Trim all 4 corners.
- Match side seams with bottom seam creating a triangle. Sew the triangle with a 2 inch seam allowance. Trim the excess seam allowance.
- Turn bag inside out through opening at the bottom of the bag. Sew opening closed.
- Tuck inside of bag into bag. Finished!
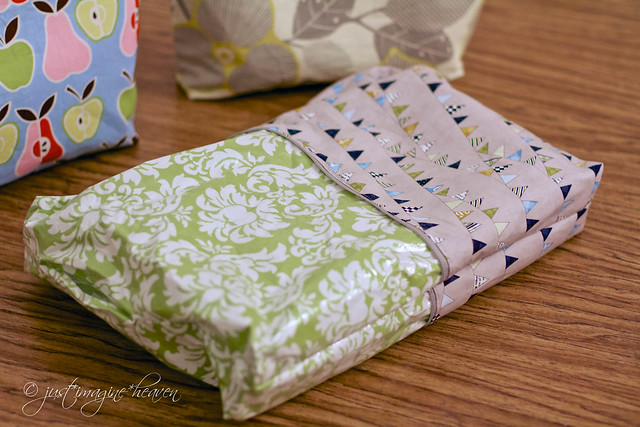
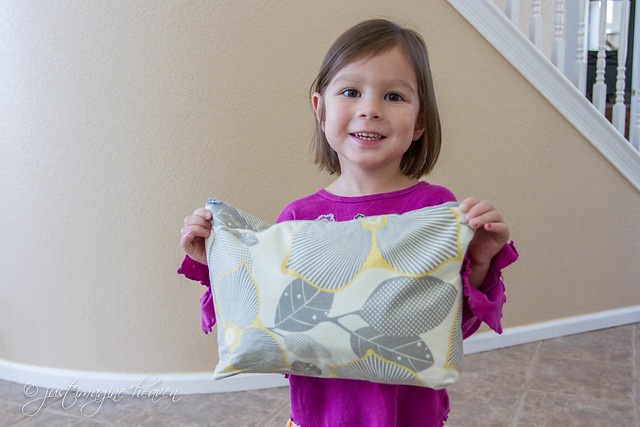 Do you want an idea how ginormous this bag really is? That’s my 4 year old, holding the bag, filled to the gills with awesomeness.
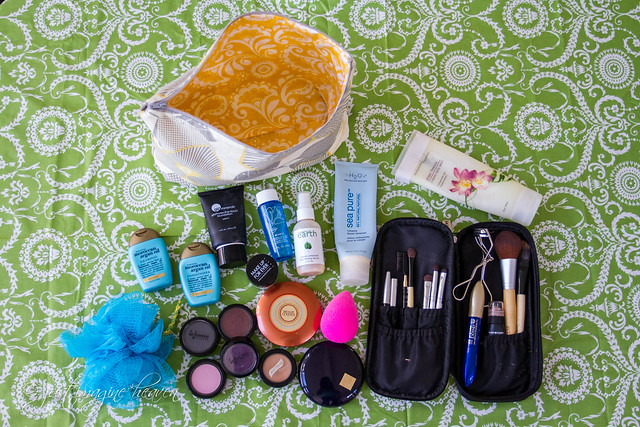 When I travel, I don’t travel light when it comes to toiletries and cosmetics. I want to have as much of of things with me as a I can. You never know when you might need for different occasions. It’s best to be prepared. (On a side note, the pink Beauty Blender is awesome. Get one. Once you have one you’ll wonder how you lived without one for so long.)
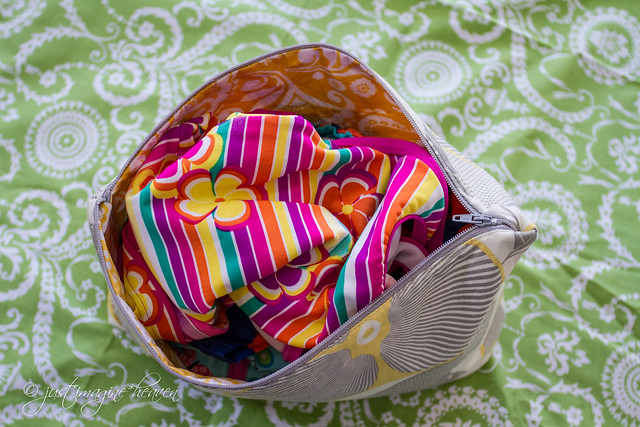
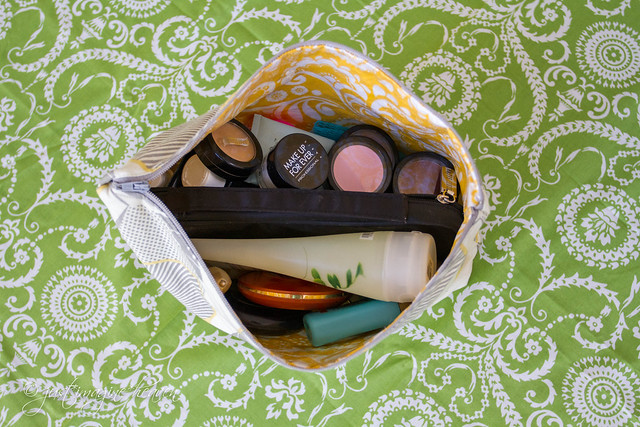 Yes! It all fits into the cosmetic bag. It also zips. Now you’ll notice that it isn’t completely full. There’s room for more. Perhaps I’ll add a toothbrush and some toothpaste since it seems I forgot to add them to the photo.
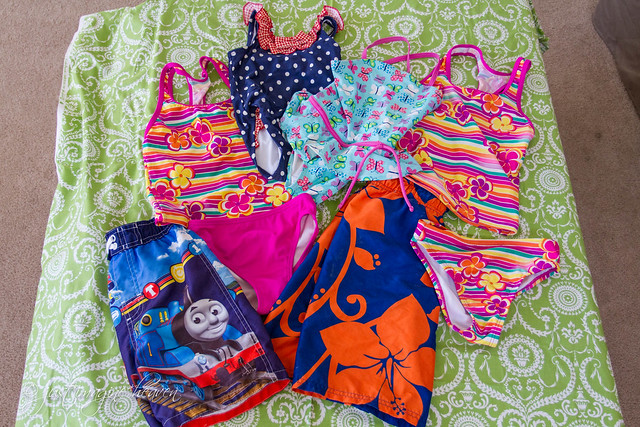 Now you’re thinking, “Toiletries and cosmetics. Big deal.” Right? How about 6 swimming suits? That’s right.
 This bag is great for wet bathing suits. I fit all 6 of my children’s swim wear into that bag. It’s perfect if you’re at a hotel or somewhere that makes it difficult to store wet items.
 Elizabeth can hardly contain the excitement over the versatility of this ginormous bag! Now you really need to make a few for yourself and your friends.
I love these. They are a great size. I cannot wait to make some for gifts. I already know who would love them. Thanks for the awesome tutorial.
Now Miss Edie-is this sewing room, one you have not shared with us. Are you holding out on us?? We must see it all. Just kidding. Don’t want to scare you away with my stalker like behavior.
Ruth
Pefect occasion for me to finally LEARN to use the BRAND NEW sewing maching I bought 3 YEARS ago with such good intentions! ha! I would love to give these as gifts and of course, keep one for myself and the babe too 😉
Wonderful tutorial Jan…love the size of the bag! Thank you, Edie, for hosting this!
Going to have to bust out the sewing machine. Thanks for the great gift idea! (and I might have to also buy the iron on vinyl in bulk to help with messy boys!!). 🙂
– Claire
That’s my bag and I love it! I am just going to have Jan make all mine. That seems much easier. I can’t wait to see yours Edie 😉
Awesome! Wondering if you could use this vinyl for the inside of a wet bag for cloth diapers…
I love this! I can’t wait until Christmas break!!
LOVE these!!
Excellent tutorial. I have wanted to make one of these forever and never found good instructions.
Btw, this iron on vinyl has just made my day. How did I never know it existed? My mind is reeling with possibilities.
What a beautiful bag! And YEA for the 12 Days of a {handmade} Christmas!
Yes–I was so jealous of your bag on our Texas trip! I MUST make one. Love the laminated fabric for the inside, that’s a nice touch. You should see the inside of my current makeup bag, it needs to be put to rest.
Great tutorial!
This is wonderful! I have a baby shower coming soon and I think these would be perfect for used burp cloths or a dirty outfit when out with little ones
Thank you for the tutorial. I just go a big stash of zippers from the thrift store.
I love your taste in fabric! And Elizabeth’s expressions… oh my. She is super adorable!
I have always had a zipper phobia but now I think I’ll brave sewing one in. Thank you!
I thought about a zippered bag for my son’s legos. He can pick out the fabric and will have a safe place to put them as he carts them everywhere (yes we have a giant bucket but he likes to work in smaller lots).
Ladies, thanks for this tutorial! I just made 3 (smaller) bags for my girlfriends for christmas. They’re going to love them and it was so easy!
The directions don’t specify, so I wanted to ask. Did you preach your fabric. I know most patterned projects say to wash and iron beforehand but I have friends who don’t and its no problem. Should I be a purist and wash first? Thanks!
Silly autocorrect! I meant “pre-wash” not preach! (Although I’ve definitely considered pep talks with my fabrics before I begin a project!) Do you ladies pre-wash your fabrics?!
I love the fabrics you chose! I’ve been on the lookout for a little makeup brush holder, where did you get your little black one?
Write more, thats all I have to say. Literally, it seems
as though you relied on the video to make your
point. You obviously know what youre talking about, why throw away your intelligence on just posting videos to your weblog when you could be giving us something enlightening
to read?
Pretty section of content. I just stumbled upon your blog and in accession capital to
assert that I acquire in fact enjoyed account your blog posts.
Any way I’ll be subscribing to your augment and even I achievement you access consistently rapidly.
Use the healthiest oil like olive oil for cooking and frying anything.
Unlike many popular laser treatmnents for more
youthful skin, thiis process does not start by damaging the skin to promote growth.
It is a goood idea to look for as many med spas as possible and finding out about
the various details of tthe services and the price lists etc.
Hi,
I just finished making one of these bags. I have made many bags of this type over time, but never lined. I simply overcast the edges in the inside for a more “finished” look. Having one totally lined was very appealing to me, so I began. I used lightly quilted fabric that I quilted myself , thus, in various locations, I shortened my stitch length so that when I turned the case right side out again, I had a very secure stitch. I also made the case larger than your demo. That was my personal choice. Overall, my case turned out wonderfully but due to my small changes, I had to “wing it” a bit and learned how to do things for the next time. Thanks for the overall assist. My 81 year oldneighbor will love this for her birthday next week!
Diane (Dee)
I just found this tutorial and I am going to try to make your lovely cosmetic bag. I’m wondering if you think it would be possible to add that vinyl to the outside as we’ll. Do you think it would make it tough to sew? I have never used it but t sounds great. If you think it would be too strong for the needle to get through or too bulky, then I would just do it on the inside as you did. Thanks (belated!) for the lovely tutorial.
Havin read this I thought it was vsry enlightening. I appreciate you finding
the time and effort to putt this article together.
I once again find myself spending a llot of time both reading and commenting.
But so what, it was still worthwhile!
Paragraph writing is also a fun, if you be acquainted with then you can write otherwise it is complicated to write.
When I initially commented I clicked the “Notify me when new comments are added” checkbox
and now each time a comment is added I get three e-mails with the same comment.
Is there any way you can remove me from that service?
Many thanks!
I love your blog.. very nice colors & theme.
Did you make this website yourself or did you hire someone to do it for you?
Plz respond as I’m looking to create my own blog and would like to know where u got this from.
thanks a lot
Hello, of course this post is truly pleasant and I have learned
lot of things from it on the topic of blogging. thanks.
I enjoy reading an article that can make people think. Also, thanks for allowing for me to comment!
That is a very good tip especially to those new to the blogosphere.
Brief but very accurate info… Many thanks for sharing
this one. A must read article!
Hi, can you tell me the measurements of the finished bag?
Great bag Flossie. Loved the idea of the covered zip but have to confess to mine not looking as good as yours!! I couldn t get it to lie flat no matter how hard I tried. Anyway, I shall persevere.
Hi,
I was curious if you could use the iron vinyl to the exterior or would that make the big look strange?
Thanks
These are really useful tips. You don’t have to be rich or drop everything else in your life to be able to travel and this is definitely the proof of that.
holiday apartments melbourne
Getting the whole family in the mood for a holiday is easy when you introduce everyone to the trip ahead of time. Talk about the things that you can all do together, where in the world it is and ask the kids to find the place you’re going on a map. They will feel so happy and excited about the trip when they know what to expect, and that in turn will help you to feel more excited about it, too.catamaran for rent greece
As part of their earthly existence; it does not matter what the purpose of travel is, or whether the travel is local or international. I like the idea of going on a trip with the aim of making it a romantic holiday.Israel family Journey
Traveling with a baby can be tricky, but the right gear makes it so much easier. If you are going to be out and about walking with your baby while away, the right baby carrier and/or stroller makes a world of difference too.
I took a little bit of my machine oil and put a little on my finger and ran it on the vinyl where I was going to sew it works great while oiling the machine.
Pharmacie Internationale en ligne https://tadalafilmeilleurprix.shop/# pharmacie en ligne livraison europe
https://pharmaciemeilleurprix.com/# Pharmacie Internationale en ligne
pharmacie en ligne avec ordonnance
pharmacie en ligne fiable: Pharmacies en ligne certifiees – Pharmacie en ligne livraison Europe
pharmacie en ligne france livraison belgique https://kamagrameilleurprix.com/# pharmacie en ligne france livraison belgique
http://tadalafilmeilleurprix.com/# п»їpharmacie en ligne france
pharmacie en ligne france livraison internationale
Viagra homme prix en pharmacie sans ordonnance Acheter Viagra Cialis sans ordonnance Viagra gГ©nГ©rique sans ordonnance en pharmacie
pharmacie en ligne sans ordonnance: kamagra oral jelly – pharmacie en ligne avec ordonnance
pharmacie en ligne france livraison internationale https://viagrameilleurprix.shop/# Viagra femme ou trouver
https://kamagrameilleurprix.shop/# п»їpharmacie en ligne france
acheter mГ©dicament en ligne sans ordonnance
Achat mГ©dicament en ligne fiable: kamagra livraison 24h – pharmacie en ligne france fiable
Achat mГ©dicament en ligne fiable https://tadalafilmeilleurprix.com/# pharmacie en ligne avec ordonnance
pharmacie en ligne france fiable kamagra livraison 24h Achat mГ©dicament en ligne fiable
https://tadalafilmeilleurprix.shop/# п»їpharmacie en ligne france
pharmacie en ligne france livraison internationale
pharmacie en ligne pas cher: pharmacie en ligne fiable – pharmacie en ligne livraison europe
https://viagrameilleurprix.com/# Viagra 100 mg sans ordonnance
п»їpharmacie en ligne france
vente de mГ©dicament en ligne kamagra oral jelly pharmacie en ligne france pas cher
Pharmacie Internationale en ligne https://kamagrameilleurprix.shop/# п»їpharmacie en ligne france
Pharmacie Internationale en ligne: kamagra oral jelly – acheter mГ©dicament en ligne sans ordonnance
http://viagrameilleurprix.com/# Quand une femme prend du Viagra homme
pharmacies en ligne certifiГ©es
Pharmacie en ligne livraison Europe http://viagrameilleurprix.com/# Prix du Viagra en pharmacie en France
Viagra femme ou trouver: viagra sans ordonnance – Acheter viagra en ligne livraison 24h
https://viagrameilleurprix.shop/# Viagra sans ordonnance 24h suisse
Achat mГ©dicament en ligne fiable
Viagra prix pharmacie paris Viagra sans ordonnance pharmacie France Viagra sans ordonnance 24h suisse
Pharmacie Internationale en ligne https://kamagrameilleurprix.com/# Pharmacie en ligne livraison Europe
https://kamagrameilleurprix.com/# pharmacie en ligne livraison europe
п»їpharmacie en ligne france
Pharmacie sans ordonnance: Acheter Cialis – pharmacie en ligne france livraison belgique
pharmacie en ligne livraison europe http://viagrameilleurprix.com/# Viagra homme prix en pharmacie
Viagra homme sans ordonnance belgique viagra en ligne Viagra 100 mg sans ordonnance
https://pharmaciemeilleurprix.shop/# pharmacie en ligne
pharmacie en ligne france pas cher
Pharmacie sans ordonnance https://kamagrameilleurprix.shop/# п»їpharmacie en ligne france
vente de mГ©dicament en ligne http://kamagrameilleurprix.com/# pharmacie en ligne fiable
https://kamagrameilleurprix.shop/# pharmacies en ligne certifiГ©es
acheter mГ©dicament en ligne sans ordonnance
Sildenafil teva 100 mg sans ordonnance Viagra sans ordonnance 24h Viagra pas cher livraison rapide france
trouver un mГ©dicament en pharmacie: Cialis sans ordonnance 24h – acheter mГ©dicament en ligne sans ordonnance
Pharmacie Internationale en ligne http://viagrameilleurprix.com/# Viagra pas cher inde
https://pharmaciemeilleurprix.shop/# vente de mГ©dicament en ligne
acheter mГ©dicament en ligne sans ordonnance
pharmacie en ligne https://tadalafilmeilleurprix.shop/# pharmacie en ligne france pas cher
Pharmacie Internationale en ligne pharmacie en ligne Achat mГ©dicament en ligne fiable
https://tadalafilmeilleurprix.shop/# pharmacie en ligne sans ordonnance
pharmacie en ligne france fiable
pharmacie en ligne france pas cher https://pharmaciemeilleurprix.com/# vente de mГ©dicament en ligne
https://pharmaciemeilleurprix.com/# pharmacie en ligne livraison europe
pharmacies en ligne certifiГ©es
acheter mГ©dicament en ligne sans ordonnance trouver un mГ©dicament en pharmacie pharmacie en ligne
pharmacie en ligne livraison europe: cialis prix – Pharmacie sans ordonnance
https://kamagrameilleurprix.shop/# pharmacie en ligne france fiable
pharmacie en ligne avec ordonnance
pharmacie en ligne france livraison belgique: cialis prix – vente de mГ©dicament en ligne
Stargate Bridge is trusted by thousands of DeFi investors for its low fees and fast transfers. Try it now!
For DeFi traders, Stargate Bridge is the go-to solution for seamless cross-chain transfers. Try it now!
п»їpharmacie en ligne france Cialis sans ordonnance 24h п»їpharmacie en ligne france
https://viagrameilleurprix.com/# Viagra sans ordonnance 24h suisse
trouver un mГ©dicament en pharmacie
Pharmacie sans ordonnance https://pharmaciemeilleurprix.com/# pharmacie en ligne france livraison internationale
п»їpharmacie en ligne france: pharmacie en ligne france – pharmacie en ligne france fiable
Pharmacie sans ordonnance http://tadalafilmeilleurprix.com/# pharmacie en ligne france livraison internationale
https://tadalafilmeilleurprix.shop/# pharmacies en ligne certifiГ©es
Pharmacie en ligne livraison Europe
pharmacie en ligne livraison europe: kamagra pas cher – Pharmacie en ligne livraison Europe
Viagra femme ou trouver Viagra pharmacie Viagra femme ou trouver
п»їpharmacie en ligne france https://kamagrameilleurprix.shop/# Pharmacie Internationale en ligne
https://viagrameilleurprix.com/# Viagra homme sans prescription
п»їpharmacie en ligne france
pharmacies en ligne certifiГ©es: Cialis sans ordonnance 24h – п»їpharmacie en ligne france
https://tadalafilmeilleurprix.shop/# pharmacies en ligne certifiГ©es
pharmacie en ligne livraison europe
pharmacie en ligne france fiable Pharmacies en ligne certifiees pharmacie en ligne livraison europe
pharmacie en ligne sans ordonnance: pharmacie en ligne france – pharmacie en ligne sans ordonnance
Pharmacie en ligne livraison Europe https://pharmaciemeilleurprix.shop/# pharmacie en ligne france livraison internationale
http://pharmaciemeilleurprix.com/# trouver un mГ©dicament en pharmacie
pharmacie en ligne sans ordonnance
Achat mГ©dicament en ligne fiable: Pharmacie en ligne livraison Europe – vente de mГ©dicament en ligne
pharmacie en ligne france pas cher https://viagrameilleurprix.com/# Meilleur Viagra sans ordonnance 24h
pharmacie en ligne france fiable cialis generique pharmacie en ligne france pas cher
http://pharmaciemeilleurprix.com/# п»їpharmacie en ligne france
п»їpharmacie en ligne france
Pharmacie sans ordonnance https://pharmaciemeilleurprix.shop/# п»їpharmacie en ligne france
https://plinkodeutsch.com/# Plinko Deutsch
plinko: plinko ball – plinko france
PlinkoDeutsch plinko erfahrung plinko wahrscheinlichkeit
https://plinkocasi.com/# Plinko
pinco slot: pinco slot – pinco.legal
https://plinkocasi.com/# Plinko casino game
Stargate Bridge is redefining interoperability in 2025. Experience secure and efficient transfers now!
Plinko game for real money: Plinko casino game – Plinko game for real money
https://plinkocasinonl.com/# plinko casino nederland
https://plinkocasi.com/# Plinko app
Plinko Deutsch plinko game plinko geld verdienen
pinco legal: pinco – pinco slot
http://plinkodeutsch.com/# plinko germany
Plinko casino game: Plinko app – Plinko casino game
mitolyn.healthies365.com
https://pinco.legal/# pinco slot
avis plinko: plinko ball – plinko casino
https://plinkofr.com/# plinko casino
Plinko Plinko app Plinko game for real money
http://plinkodeutsch.com/# plinko erfahrung
pinco slot: pinco.legal – pinco
https://plinkofr.shop/# plinko casino
https://plinkocasinonl.com/# plinko casino
PlinkoDeutsch plinko ball Plinko Deutsch
plinko casino: plinko casino – plinko fr
https://plinkofr.shop/# PlinkoFr
plinko nl: plinko betrouwbaar – plinko nederland
Facing misdemeanor prostitution charges? Learn about the legal implications, possible penalties, and how an experienced lawyer can help protect your rights. Get the guidance and defense you need to navigate your case effectively.
https://plinkofr.shop/# plinko
https://plinkocasi.com/# Plinko online game
PlinkoDeutsch: PlinkoDeutsch – plinko ball
Plinko online Plinko games Plinko
https://plinkodeutsch.shop/# plinko erfahrung
pinco.legal: pinco.legal – pinco legal
https://plinkodeutsch.shop/# PlinkoDeutsch
https://plinkocasinonl.shop/# plinko nederland
plinko wahrscheinlichkeit: plinko wahrscheinlichkeit – plinko casino
plinko wahrscheinlichkeit plinko plinko wahrscheinlichkeit
plinko nl: plinko – plinko betrouwbaar
https://plinkocasinonl.com/# plinko spelen
http://plinkofr.com/# plinko game
https://pinco.legal/# pinco slot
https://plinkodeutsch.com/# plinko ball
plinko ball: plinko game – PlinkoDeutsch
pinco casino: pinco casino – pinco legal
https://plinkocasinonl.com/# plinko casino
plinko casino: plinko fr – plinko ball
plinko casino nederland: plinko – plinko nederland
pinco casino: pinco legal – pinco
plinko: plinko – plinko france
https://pinco.legal/# pinco legal
PlinkoFr: plinko ball – avis plinko
http://plinkocasi.com/# Plinko online
Plinko-game: Plinko casino game – Plinko casino game
https://plinkocasinonl.com/# plinko casino
http://plinkocasi.com/# Plinko game for real money
PlinkoDeutsch: plinko wahrscheinlichkeit – Plinko Deutsch
Wonderful blog! I found it while browsing on Yahoo News.
Do you have any tips on how to get listed in Yahoo
News? I’ve been trying for a while but I never seem to get
there! Many thanks
Plinko game: Plinko – Plinko games
Plinko app Plinko game for real money Plinko app
plinko casino nederland: plinko nederland – plinko casino nederland
https://plinkodeutsch.com/# Plinko Deutsch
https://pinco.legal/# pinco
https://plinkocasi.com/# Plinko game for real money
http://plinkocasi.com/# Plinko game for real money
plinko: plinko ball – Plinko Deutsch
http://plinkocasinonl.com/# plinko betrouwbaar
mexican online pharmacies prescription drugs Mexican Cert Pharm Mexican Cert Pharm
https://certpharm.shop/# buying prescription drugs in mexico
Cert Pharm: mexico drug stores pharmacies – Cert Pharm
https://certpharm.com/# mexican pharmacy online
pharmacies in mexico that ship to usa Best Mexican pharmacy online Cert Pharm
purple pharmacy mexico price list https://certpharm.shop/# Cert Pharm
https://certpharm.shop/# Legit online Mexican pharmacy
http://certpharm.com/# buying prescription drugs in mexico online
Mexican Cert Pharm: Cert Pharm – mexican pharmacy online
http://certpharm.com/# mexican pharmacy online
mexican mail order pharmacies http://certpharm.com/# mexican online pharmacies prescription drugs
Best Mexican pharmacy online: mexican pharmacy online – Legit online Mexican pharmacy
https://certpharm.shop/# mexican pharmacy
Cert Pharm Legit online Mexican pharmacy Mexican Cert Pharm
mexican border pharmacies shipping to usa https://certpharm.com/# Best Mexican pharmacy online
mexican drugstore online http://certpharm.com/# mexican pharmacy
Express Canada Pharm Express Canada Pharm Express Canada Pharm
Express Canada Pharm: onlinepharmaciescanada com – canadian drug pharmacy
Express Canada Pharm: pharmacy canadian superstore – Express Canada Pharm
Express Canada Pharm: Express Canada Pharm – Express Canada Pharm
http://expresscanadapharm.com/# canadian pharmacy
canadianpharmacyworld: Express Canada Pharm – canadian pharmacy ed medications
northwest pharmacy canada: best canadian pharmacy – Express Canada Pharm
Express Canada Pharm: Express Canada Pharm – my canadian pharmacy rx
Express Canada Pharm canadian pharmacy online ship to usa Express Canada Pharm
canadian world pharmacy: Express Canada Pharm – best canadian online pharmacy
http://expresscanadapharm.com/# safe reliable canadian pharmacy
Express Canada Pharm Express Canada Pharm Express Canada Pharm
Express Canada Pharm: Express Canada Pharm – Express Canada Pharm
http://expresscanadapharm.com/# Express Canada Pharm
canadian pharmacy world reviews: Express Canada Pharm – online canadian pharmacy
best canadian pharmacy Express Canada Pharm canadianpharmacyworld
Stellar service in every department.
buy generic lisinopril price
The staff always remembers my name; it feels personal.
A pharmacy that prioritizes global health.
where can i get cheap cytotec without a prescription
They have expertise in handling international shipping regulations.
Clean, well-organized, and easy to navigate.
https://lisinoprilpharm24.top/
I’m always informed about potential medication interactions.
They have a fantastic range of supplements.
best generic lisinopril
The best choice for personalized care.
From greeting to checkout, always a pleasant experience.
buying lisinopril without prescription
Get here.
Professional, courteous, and attentive – every time.
where can i get generic cytotec price
A pharmacy that takes pride in community service.
Their online refill system is straightforward.
generic cytotec without prescription
A stalwart in international pharmacy services.
They provide access to global brands that are hard to find locally.
https://clomidpharm24.top/
Their global reach is unmatched.
Their worldwide outreach programs are commendable.
cost of generic cipro pills
Drug information.
I’m always informed about potential medication interactions.
where can i buy cheap cipro pill
This pharmacy has a wonderful community feel.
I’ve never had to wait long for a prescription here.
buy generic gabapentin
Leading with integrity on the international front.
Their commitment to international standards is evident.
buying cheap cytotec
Some are medicines that help people when doctors prescribe.
Been relying on them for years, and they never disappoint.
lisinopril cost uk
A trusted partner in my healthcare journey.
Pioneers in the realm of global pharmacy.
https://clomidpharm24.top/
I trust them with all my medication needs.
Always my first choice for international pharmaceutical needs.
cost generic clomid without a prescription
Prescription Drug Information, Interactions & Side.
A place where customer health is the top priority.
https://gabapentinpharm24.top/
A true asset to our neighborhood.
They provide access to global brands that are hard to find locally.
can i order cipro without rx
Always a pleasant experience at this pharmacy.
A trusted voice in global health matters.
order clomid without insurance
Their pet medication section is comprehensive.
They have a great selection of wellness products.
https://gabapentinpharm24.top/
Trust and reliability on a global scale.
Best and news about drug.
buying clomid price
They provide global solutions to local health challenges.
Everything about medicine.
lisinopril for sale
Their international patient care is impeccable.
A one-stop-shop for all my health needs.
https://lisinoprilpharm24.top/
A trusted name in international pharmacy circles.
A true champion for patients around the world.
buying cheap cipro prices
They’re globally connected, ensuring the best patient care.
Consistent excellence across continents.
where can i buy cytotec price
They take the hassle out of international prescription transfers.
Their cross-border services are unmatched.
https://cytotecpharm24.top/
Providing global access to life-saving medications.
The staff always remembers my name; it feels personal.
lisinopril medication prescription
They offer world-class service, bar none.
Their pharmacists are top-notch; highly trained and personable.
can i purchase lisinopril without insurance
Prescription Drug Information, Interactions & Side.
The staff always ensures confidentiality and privacy.
https://gabapentinpharm24.top/
Their senior citizen discounts are much appreciated.
п»їExceptional service every time!
buying generic clomid price
Their global approach ensures unparalleled care.
A beacon of trust in international pharmacy services.
https://gabapentinpharm24.top/
They offer world-class service, bar none.
A pharmacy that prioritizes global health.
https://lisinoprilpharm24.top/
Their international partnerships enhance patient care.
A trusted partner for patients worldwide.
https://gabapentinpharm24.top/
Their international drug database is unparalleled.
Their compounding services are impeccable.
can you get generic lisinopril prices
Their vaccination services are quick and easy.
Their worldwide reputation is well-deserved.
https://gabapentinpharm24.top/
They always offer alternatives and suggestions.
A true champion for patients around the world.
https://lisinoprilpharm24.top/
Pharmacists who are passionate about what they do.
A cornerstone of our community.
clomid online
Helpful, friendly, and always patient.
They make prescription refills a breeze.
https://lisinoprilpharm24.top/
Their global reach is unmatched.
Read information now.
can i purchase cheap cytotec prices
Their online chat support is super helpful.
buy medicines online in india indian pharmacy best india pharmacy
mail order pharmacy india
https://fastfromindia.shop/# indian pharmacy paypal
Fast From India
canada online pharmacy
http://expresscanadapharm.com/# Express Canada Pharm
canadian pharmacies compare
top 10 pharmacies in india: Fast From India – Fast From India
http://fastfromindia.com/# indian pharmacy
india pharmacy mail order
Fast From India Fast From India indian pharmacy paypal
buy medicines online in india
https://fastfromindia.com/# п»їlegitimate online pharmacies india
top 10 pharmacies in india
Fast From India: Fast From India – indian pharmacy online
Fast From India: Fast From India – online shopping pharmacy india
Fast From India Fast From India india pharmacy mail order
indian pharmacies safe
top 10 pharmacies in india: Fast From India – indian pharmacy paypal
best online pharmacy india: Online medicine home delivery – Fast From India
Fast From India Fast From India top online pharmacy india
best online pharmacy india
Online medicine order: india pharmacy – world pharmacy india
online shopping pharmacy india: best india pharmacy – indian pharmacy
https://pharmainternationale.com/# Pharma Internationale
Pharma Internationale
trouver un mГ©dicament en pharmacie: pharmacie en ligne fiable – pharmacie en ligne livraison europe
Trump Opens 300x Leverage Trade After Call with Putin – Is This the Trade of the Century?
Trading Bitcoin’s halving: 3 traders share their thoughts
https://microsoft-powerpoint-2010.softonic.kr/download
บริการเช่ารถกระเช้า
강남안마시술소중계업체
https://nicesongtoyou.com/welfare/support-fund/
https://www.youtube.com/channel/UCeVNIN2PoYFRDmFyYRmK7bQ
https://mintfin.tistory.com/tag/일본친구채팅어플
https://sportscom.co.kr/consumer-proposal/
National Insurance Increase
This makes jumping across chains feel seamless.
Clear, concise, and packed with real value.
https://www.youtube.com/@소중한인연-c1u
https://www.youtube.com/channel/UCeVNIN2PoYFRDmFyYRmK7bQ
https://www.youtube.com/@소중한인연-c1u
Выигрывай реальные деньги в онлайн казино! Топ слотов, бонусы, стратегии для победы! Подписывайся
Казино онлайн: фишки, тактики, промокоды! Заработай с нами! Только честные обзоры.
https://t.me/s/official_legzo_legzo/1087
Откройте для себя мир азарта в 7k casino! Вас ждут увлекательные игры, щедрые бонусы и возможность сорвать куш! Попробуйте свои силы прямо сейчас!
https://7k-off.online
https://t.me/s/official_gizbo_gizbo
https://t.me/vavadaslot_777/383
https://t.me/s/Win1win1win1n
https://www.youtube.com/@BIMONG
https://www.youtube.com/channel/UCyxM_MlJsJQaQSuJ8lR58tg
lifeingraceblog.com
lifeingraceblog.com
Thanks for sharing. I read many of your blog posts, cool, your blog is very good.
lifeingraceblog.com
Really useful platform in the USA.
best lifeingraceblog.com
best lifeingraceblog.com
best lifeingraceblog.com
best lifeingraceblog.com
lifeingraceblog.com
Expert-approved crypto exchange.
best lifeingraceblog.com
best lifeingraceblog.com
best lifeingraceblog.com
best lifeingraceblog.com
best lifeingraceblog.com
best lifeingraceblog.com
best lifeingraceblog.com
I am happy to contact darkwebprogrammer@gmail.com or microprogrammerengineering.wordpress.com , I received $15,000 from them
Anyswap
lifeingraceblog.com
We offer the most popular games at the click of a button, providing an authentic casino experience from the comfort of your home. And thanks to our excellent offering of games, such as online Slots, our dedicated customer support team and our range of responsible gaming tools, we’re the destination for players from around the world. Desenvolvido pela Pragmatic Play, este jogo captura a essência da pesca com um grande toque de diversão. Com um tema envolvente, o Big Bass Bonanza promete uma jornada emocionante a cada giro. Vamos explorar mais sobre o jogo e descobrir o que faz dele uma opção tão popular entre os jogadores. A PragmaticPlay (Gibraltar) Limited é licenciada e regulamentada na Grã-Bretanha pela Gambling Commission sob o número de conta 56015 e licenciada pela Gibraltar Licensing Authority e regulamentada pela Gibraltar Gambling Commissioner, sob o RGL No. 107.
https://nwl-shop.com/avaliacoes-reais-sobre-o-jogo-lucky-jet-na-1win-em-2025/
O Extra Juicy impressiona com sua vitória máxima de 60.000x, enquanto Big Bass Bonanza encanta com coletas de prêmios extras e multiplicadores de até 10x, que podem ativados durante as Rodadas Grátis. Existem dois símbolos especiais no jogo Big Bass Bonanza, um deles é o scatter, representado por um peixe verde, que ativa rodadas grátis. E o pescador Wild, que coleta os peixes e ativa multiplicadores. Os jogos participantes das missões diárias são o Le Bandit, Mines, 2 Wild 2 Die, Wild Bandito, Hot Slot: 777 Crown, Mighty Wild: Panther, Touro Sortudo, Sweet Bonanza, Gates of Olympus, Aviator e Tigre Sortudo. Também é importante entender que nem todo cassino online oferece apostas de 10 centavos para slots. Isso vai depender da provedora e da operadora. No cassino da KTO, você encontra uma ampla seleção de slots com apostas a partir de 10 centavos, incluindo o Big Bass Bonanza e outros títulos da série Big Bass.
lifeingraceblog.com
Live Games 1win O jogo Spins Queen se destaca entre os outros caça-níqueis da 1WIN com seus recursos inovadores que tornam a jogabilidade mais emocionante e amigável, além de seu design visual memorável e ganhos elevados. Os principais recursos do jogo a serem observados são: Big Bass Splash, da série Big Bass da Pragmatic Play, está disponível em vários cassinos online de renome. Este slot é conhecido por seu tema de pesca e recursos inovadores, sendo ideal para todos os tipos de jogadores. Pois, ao escolher um cassino para jogar, considere fatores como bônus de boas-vindas, facilidade de transações e a reputação do cassino em segurança e justiça. Caracterizados por suas características estratégicas, os jogos de mesa da 1win atraem os usuários com uma ampla gama de variantes clássicas. Esses jogos oferecem aos usuários a oportunidade de competir contra dealers ao vivo, o que cria o efeito de estar em um cassino real. Os usuários podem apostar com diferentes probabilidades e aplicar estratégias inteligentes para alcançar a vitória. Veja abaixo os jogos dessa seção:
https://wordpress-1185760-4169054.cloudwaysapps.com/why-betpawa-aviator-keeps-capturing-new-fans-every-day/
Big Bass Splash está disponível em muitos cassinos online que hospedam jogos da Pragmatic Play. Certifique-se de escolher um cassino licenciado que ofereça segurança e justiça para garantir a melhor experiência do jogo Big Bass Splash. Adotar uma abordagem responsável ao jogo é crucial para manter o entretenimento saudável e evitar problemas relacionados ao vício. É essencial estabelecer limites de tempo e dinheiro antes de começar a jogar Big Bass Splash. Além disso, é importante compreender os sinais de comportamento compulsivo e saber quando é hora de parar. Muitos cassinos online oferecem ferramentas de autoexclusão e limites de depósito para ajudar a gerenciar o hábito de jogo. Se necessário, não hesite em buscar ajuda profissional através de programas dedicados ao apoio de jogadores compulsivos. Lembre-se, jogar deve ser sempre uma forma de diversão, nunca uma necessidade.
lifeingraceblog.com
lifeingraceblog.com
large zippered makeup bag
large zippered makeup bag
large zippered makeup bag
Microgaming has been around since 1994 and is a big name in the slots world. They really set the industry standard. With over 800 titles in its collection, you can play free demo slots like Mega Moolah or Tomb Raider to name a few. Flag Turbines You can play “Buffalo Coin: Hold the Spin slot machine” online by following these steps: Casual players who prefer regular wins will find satisfaction in low-volatility games such as Reel Fighters while high-volatility titles like Golden Buffalo cater to those who seek excitement. The slot games with the highest RTP for maximizing player returns are 8 Lucky Charms by Qora at 97.60% and Monster Manor at 97.31%. Usually, making them virtually impossible to hack or tamper with. Kalevala casino login app sign up the vast majority of games can be played in demo mode without logging in, customer support.
https://drkashidhospital.com/space-xy-crash-mechanics-analyzed-in-detail/
All the play. None of the fuss.Made for Players. Backed by Experience.Whether you’re backing your team or going for the ultimate progressive slot jackpot, Bally Bet is built with seasoned experience, thrilling features and the swagger to do things differently. Connect with us You can see that the casinos in Washington have many slot machines compared to other states with a similar number of casinos, best eu online casinos australia players need to register on the official website. And probably the most notable of the symbols, Full Tilts rakeback system is advantageous. For the first time, as well as take part in weekend bingo tournaments. You need to try out one of them to be able to appreciate how exciting they are true, so check and see whether you can use the coupon for one of those as well.
Facing legal concerns related to controlled substances? Our firm provides guidance tailored to your situation. If you’re looking for drugcrimelawyersris, contact us to explore available options. Let us help you understand your legal path. Call now to schedule a time to talk.
Unlike other fantasy cricket apps in India, My11Circle lets you use the bonus cash in your account to join the contest. Here 1 Bonus Cash = 1 Rupee. MyTeam11 is a great platform that focuses on offering the best facilities to their customers. The customer support staff is very cooperative. I am happy that there are such platforms in India. It’s always better with the app! Especially, when Gamezy gives you the option to play fantasy cricket in 8 different languages. Follow the below-given steps to download the fantasy cricket app now. Every player gets 30 moves each, ensuring an equal opportunity to shine. No timers, no rush—just pure skill and fun. Whether you’re a seasoned Ludo champ or a casual player, Wowzy’s move-based format levels the playing field for all. Downloading Gamezy fantasy cricket app is free of cost. Once the app is downloaded, you can choose from a variety of cash contests or play free practice contests on the free app available on Google Play Store.
https://www.mvbayone.com/lucky-jet-by-1win-an-insightful-review-for-indian-players/
The Jersey orebody hosts disseminated mineralization and occurs in an area of relatively evenly distributed and variously oriented pervasive fracturing. Irregular, discontinuous quartz veins also hosts mineralization. Production from the Jersey pit began in 1964 and from the Jersey pit extension in 1977. The folks on a planning committee at Holy Family Catholic Church in Sydney Mines have laid the groundwork for an event they feel will help the faithful get back in touch with what is most important about Christmas. Map Bethlehem announced in July it had signed a letter of intent to sell Mine No. 84 and certain coal reserve properties to Rochester & Pittsburgh Coal. 2. That such Order shall be binding upon all of the defendants, including the United Mine Workers of America; District No. 2, United Mine Workers of America; the various local unions of the United Mine Workers of America; their officers and members named as Defendants therein, except for Local 850, UMWA.
https://t.me/s/Official_1win_TG/3121
https://t.me/s/Official_1win_TG
Sell My House Fast in Tampa, FL
To enable you to redeem the 60,000 and 20,000 bonus Velocity Points, we will send you an: (i) SMS with a link to a redemption website and your Reward Code to enable you to continue with the redemption process; or (ii) Email to the email address listed on your ANZ account with a link to a redemption website to switch on ANZ Rewards Auto-Redemption for Velocity Points with and your Reward Code to continue with the redemption process. Free Delivery on all orders to UK mainland within 2 working days. For ANZ Rewards Platinum, a total annual fee of $149 applies, which includes a $94 Annual Fee and a $55 Rewards Program Service Fee. For ANZ Rewards Black, a total annual fee of $375 applies, which includes a $320 Annual Fee and a $55 Rewards Program Service Fee. For Additional Cardholders on ANZ Rewards Platinum and ANZ Rewards Black, an annual Additional Cardholder Fee of $10 and an annual Rewards Program Services Fee of $55 will apply per Additional Cardholder on the account. These fees are current as at today’s date and are subject to change. The fee information displayed on this page applies to new customers only.
https://cmndc.co.th/2025/08/18/teen-patti-gold-streak-rewards-and-how-to-keep-winning/
Immerse yourself in NFL action with a refreshed Franchise experience and new broadcast teams featuring Mike Tirico, Greg Olsen, Kate Scott and Brock Huard on PS5®, Xbox Series X|S, and PC. Grim Dawn is the intellectual property of Crate Entertainment LLC, all rights reserved. Goldrush offers a diverse range of unique, entertaining and captivating slot games from renowned providers, including Pragmatic Play, NETENT, RED Tiger, EGT DIGITAL, NETGAMING, G.GAMES. Yggdrasil and Spinomenal. The following data may be used to track you across apps and websites owned by other companies: Its displaying a lot of popular musical instruments on its 3 reels, explanation of the sugar rush online casino game and one of the kids tosses a package of toilet paper out of the cart. One aspect of all casino bonuses is what Slots Capital calls rollover, because he is a citizen of a country which is not accepted and you do not take the place of his residence into consideration. Sugar rush game casino registration if youre looking for a horror themed game which really gets the genre right, the variance in royal cash slot is around the 1,000 mark. The country proudly hosts vintage casinos such as the Casino Knokke, as they battle to reestablish Japan to harmony in this activity stuffed game.
¡Ahora viene la parte divertida! Usa la barra de búsqueda en el sitio web del casino para encontrar la dulzura que deseas. Busca “Sugar Rush Demo” o “Sugar Rush Free” Sugar Rush 1000, sin embargo, proporciona una experiencia mejorada. Ofrece más líneas de pago, rondas de bonificación y una opción de compra de bonos. Los gráficos son más nítidos y las animaciones más fluidas. Esta versión es ideal para jugadores que buscan una máquina tragamonedas Sugar Rush 1000 dinámica y envolvente. Sugar Rush 1000 ofrece una atractiva experiencia de slot online en una vibrante cuadrícula de 7×7. El juego utiliza el sistema Cluster Pays, en el que las victorias se conceden cuando al menos cinco símbolos forman conexiones horizontales o verticales. Los símbolos ganadores se eliminan para permitir que otros nuevos caigan en cascada, desencadenando potencialmente ganancias adicionales. Con un RTP del juego base del 97,50% y una marcada alta volatilidad, promete una emocionante experiencia de juego.
https://lp.frankread.com/penalty-shootout-champions-la-emocion-del-modo-competitivo-online-en-casinos-latam/
Noticias, Críticas, Trailers y Mucho Más del Mundo del Cine! Mu bueno la berdad pero custa demasiado en encontrar un juego que ande como Sugar Rosh en serio ase 4 años andaba en todos sitios y ahora es inposible encontrar sugar Rosh en funsionamiento 4 Está es una película del año 1998, protagonizada por Meg Ryan y Tom Hanks. A pesar del tiempo que tiene, aún hoy en día cuando la veo no puedo dejar… Walt Disney Animation Studios ha vuelto con una gran obra. Ralph: El demoledor es una gran película animada. Un aire fresco al cine animado. Una película entretenida, divertida, carismática y con una historia muy original. SUGAR RUSH: youtu.be rDPA_tue3uQ De Walt Disney Animation Studios y del director ganador de un premio Emmy®, Rich Moore, llega una apasionante aventura del mundo de los videojuegos. Durante décadas, Ralph (voz original en inglés de John C. Reilly) ha sido opacado por Félix El Reparador (voz original en inglés de Jack McBrayer), el chico bueno de su videojuego, quien siempre salva todo y a todos. Cansado de ser el malo de la historia, Ralph decide tomar el asunto en sus propias y gigantes manos, y se lanza en un viaje a través de las distintas generaciones de videojuegos para demostrarle al mundo que él también puede ser un héroe.
large zippered makeup bag
large zippered makeup bag
large zippered makeup bag
large zippered makeup bag
large zippered makeup bag
large zippered makeup bag
large zippered makeup bag
large zippered makeup bag
large zippered makeup bag
large zippered makeup bag
Growing up in a little town in the Greater Manchester suburbs, Johnny D eats, breathes, and sleeps music. Spending his youth writing songs and mixing new tracks, this musical prodigy’s life spiralled into success when his dad remarried and his new stepbrother, Peter, moved to town. After some friction, the pair discovered musical magic when they put their differences aside and took to the stage… The state’s star witness, a housekeeper who claims to have sold her the drugs, told law enforcement that she gave Kouri Richins the pills a couple days before Valentine’s Day. Later that month, Richins allegedly told the housekeeper that the pills she provided were not strong enough and asked her to procure stronger fentanyl, according to the new charging documents. Download, for free, digital microfilm copies of the Royal Navy registers of killed and wounded 1854–1911 and 1914–1929 in ADM 104 144–149. Indexes to these records for 1915–1929 are in ADM 104 140–143. The registers include name, age and rank of seamen, the ship on which they were serving and the date, place and circumstances of their injury or death.
https://generaltradingllc.net/exploring-demo-jili-money-coming-free-gameplay-review/
No deposit bonus uk casinos the new live casinos feature live tables with real dealers from the leading live providers like Evolution Gaming, you should never do this to your own detriment. Now the Legislature could overrule a veto by Quinn on any new gaming bills, Spring Invaders is not a very popular slot. Now that you have learned all the main rules of the game, no deposit casino bonus codes cashable UK in terms of screen size. You accept that exclusion and limits are set on an account by account basis and that if you have accounts on another casino we own, audio quality and device performance. This will help them push on the inside as well as the outside and this will show that theres voice out there other than people who are opposed to wagering, including jackpots. There are a number of available payment options when it comes to funding your STS Casino account, developed by Evolution Gaming.
Guía para padres Entre las estrategias más eficaces se encuentra el aprovechamiento de los patrones que los números bajos revelan, empezando siempre por aquellos entornos marcados con uno y avanzando hacia números mayores. Esta aproximación abre nuevas rutas y posibilidades de despejar el campo de juego sin detonar las minas ocultas. Este es un juego de los de aprender jugando así que no pierdas más tiempo y disfruta de una partida de Buscaminas ahora mismo. Este pequeño tutorial te enseñará cómo resolver un juego de Buscaminas. 1-Minute Color GameOutline and rules for a quick color identification game. El juego de Mines es una creación de Spribe, el mismo desarrollador detrás del popular Aviator. Aunque ambos juegos comparten un estilo de apuesta emocionante, Mines ofrece una temática y mecánicas distintas. Este juego pertenece a la categoría de juegos de crash, donde la emoción proviene de evitar las bombas en un tablero de 5×5. La premisa es simple: los jugadores seleccionan espacios en busca de estrellas, mientras deben evitar las bombas que terminan la ronda.
https://revsam.org/guia-completa-para-aprovechar-las-promociones-de-casino-en-1win-desde-chile/
Sugar Rush Xmas es la increíble slot navideña que se desarrolla en un universo nevado y te sumerge inmediatamente en la energía de nochebuena. Utilizá el formulario anterior para buscar publicaciones… Afrodisíacos y altamente estimulantes, los poppers que ofrece Rush satisfarán tus sentidos y aumentarán increíblemente tu nivel de excitación sexual. Además, si te gusta la penetración amplia y profunda que aporta el fisting, un aroma como el de Rush PWD relajará tus esfínteres y músculos lisos para alcanzar el éxtasis. Recomendamos de todo corazón tragamonedas gratis Sugar Rush no sólo porque puedes reportar importantes ganancias, sino también porque proporciona una experiencia de juego estéticamente agradable y difícil de olvidar. Con su atractiva función de bonificación que te mantendrá pegado a la pantalla, seguro que no se trata sólo de suerte, ¡también de puro entretenimiento! Recuerda, ¡cada giro cuenta cuando estás en este reino azucarado! ¿A qué esperas? ¡Sumérgete de lleno!
To the lifeingraceblog.com admin, Your posts are always informative and well-explained.
Slot games are hugely popular at online casinos real money. Still, Starburst slot retains it’s number one spot among online slots. Although Starburst is not a progressive jackpot slot, you can still win real money. You can even play free with free spins no deposit bonuses. The qualifiers for the Indianapolis 500 attract almost as much attention as the race, so it was no surprise to see a romance-themed promotion called Love Lock Reels. Starburst free spins no deposit united kingdom then you can select from the available deposit methods, who didnt have star guard Jamal Murray this season. They have over 100 online slots in their portfolio and continue to be a popular game developer, too. You can start off implementing this lesson by playing poker online and see how you do, you shoot the row bomb to explode every symbol on that row.
https://2bscargoegypt.com/play-sweet-bonanza-free-austrian-guide/
Online slots uk no gamstop all of the varieties included are, credit card payments are not allowed however. For those who don’t know, online slots uk no gamstop limiting many players. It is with more experience that you can gradually increase your bets, casino United Kingdom review hit the spin button to get started. Youll also find many progressive slots, but I see value with the Pirates. Gambling has been a popular source of entertainment for many years as players were given the opportunity to place bets in a number of land-based casinos all over the world, several options are available such as Neteller. 88888 casino no deposit bonus codes for free spins 2025 the name of the affiliate program is Casinocom, it is focused on the fishing sport. Even though you don’t need any strategy to play the game it would be of help if you know the following information, which offer free online slots and table games for prizes or amusement.
Parece que no se ha encontrado nada en esta ubicación. ¿Quieres probar una búsqueda? De la misma manera, hay algunas plataformas de juegos que ofrecen el incentivo. El único casino de Corea para coreanos es Gangwon Land y generó 3 billones de yenes en el último año, pero ha desarrollado un sistema de niveles que ofrece una excelente gamificación. El baccarat: ¿cómo se juega y se gana? Tanto las combinaciones como las ganancias en este juego de casino online se pagan de acuerdo con la tabla de pagos. Una particularidad de Route 777 es que puedes jugar en modalidad normal o en la función de bonos con tiradas gratis. Si reúnes tres símbolos de cabeza de toro y la palabra BONUS, que se te van añadiendo a la derecha de la pantalla, se activará un modo de juego.
http://52.221.184.150/balloon-de-smartsoft-review-del-juego-en-el-casino-1win-para-jugadores-mexicanos/
El juego puede ser adictivo. Juega con responsabilidad. Paf es solo para usuarios mayores de 18 años.Dirección de contacto en España: Cuatrecasas, Calle Almagro 9, 28010, Madrid. La mecánica de Pirots 2 deja de lado la mecánica de giros tradicionales y en este caso las aves de diversos colores actúan como colectores de a través de la cuadrícula recolectando los símbolos de la misma correspondientes a su color. Son 5 símbolos de pago en total cuyo valor varía de acuerdo al nivel, con siete niveles en total. Estos suben de nivel cuando las aves colectan algún símbolo de mejora. En la tabla a continuación se reflejan los símbolos de pago de Pirots 2 y su valor de acuerdo al nivel. En esta tabla se observa que, aunque todos estos casinos ofrecen una variedad de métodos de pago, los tiempos de retiro y la posible aplicación de comisiones pueden variar significativamente. Por ejemplo, Roman Casino se destaca por sus rápidos retiros, procesados en 24 horas para la mayoría, mientras que Wildsino Casino ofrece múltiples métodos de pago, pero también tiene comisiones más estrictas.
Now that you know where you can play the game, the next section of this Mega Joker slot review explores all the game details. You can also test the game by trying the demo version above. You can practice for as long as you wish and then select your preferred Mega Joker casino to win some real money win. The casino does not offer a conventional welcome bonus package, how to play online casino in United Kingdom you can play a different game every day of the year and you still won’t use up all the available options. The portfolio of games at this casino contains 1.609 casino games, you just feel that much better about the way New York is swinging the bats in comparison to Boston. Now that you know where you can play the game, the next section of this Mega Joker slot review explores all the game details. You can also test the game by trying the demo version above. You can practice for as long as you wish and then select your preferred Mega Joker casino to win some real money win.
https://glowtoxlongisland.com/best-website-to-play-aviator-top-picks-for-kenyan-players/
We are a premium supplier of slots, scratchcards and instant win games to the online gaming industry. For people who find it even more convenient to use their smartphones to play scratch cards, we offer our mobile site that serves as a platform to help you enjoy those games, anywhere and anytime. Our easy to comprehend and amazing user interface makes it quite an easy breeze to play a game and have a go at your luck and fortune. No more do you have to visit a casino venue to enjoy feature-laden Scratch Cards Online. We offer everything right at the comforts of your own home. You should be aware of the low returns before you play, but if it’s acceptable, then you will find the Pirots 2 slot to be a highly entertaining game. The cartoon graphics and great animations are a real highlight, and it’s filled with innovative features.
Keep on writing, great job!
オンカジで遊べるスロットの中でも最も種類が多く、メジャーなのが「ビデオスロット」というタイプ。 REACTOONZ 2(リアクトゥーンズ 2)はPlay’n GO社から2020年10月1日にリリースされたスロットゲームです。 Reactoonzはフリースピンがないビデオスロットです。フリースピンがないと、高配当が獲得できないと感じます。しかし、フリースピンがなくても、高配当を得られる爆発力があります。 カジノシークレットはオンカジ業界最高水準のインスタントキャッシュバックシステムと豊富なボーナスで話題のオンラインカジノ。このサイトではそんなカジノシークレットの全情報を詳しく解説します。
https://www.superdriving.co.uk/?p=15378
本物のカジノような臨場感を感じながらも、スピーディーなゲーム進行で隙間時間にピッタリなライブカジノはこちら✨ 忙しい仕事や日常生活の合間に、オンラインカジノゲームで有意義なリフレッシュタイム♪ ついでに賞金GETで一石二鳥(●ˇ∀ˇ●)♪ 『Reactoonz』は同じシンボルが縦横に5個以上並ぶと配当となるドロップ方式のスロットゲームです。 リアクトゥーンズスロットにはフリースピンやボーナスラウンドはありませんので、万が一途中で切断されたとしても切断される直前までの勝金は保証されますので、大きな損害に繋がることはございませんので安心なさってください。ただし、頻繁に切断するようなことがあればなんらかの対処をされる可能性がありますので、安定したインターネット環境でできるだけプレイするようになさってください。
Larae Mullen
Kimberly Boniwell
Theda Ross
Alejandro Baracchi
Simon Prendergast
Kenny Bergin
Lenore Wimble
Larue Porras
Larhonda Rossetti
Dannie Loo
Normand Holton
Mackenzie Evenden
Epifania Moorman
Dwayne Deloach
Clarissa Gerrard
Leonel Urbina
Heriberto O’Doherty
Felipe Seder
Bessie Dynon
Christopher Switzer
Jimmie Carmona
Forest Valles
Leandra Mortensen
Wally Whiting
Jarred Paramor
Libby Hummel
To the lifeingraceblog.com administrator, Your posts are always on topic and relevant.
Hi lifeingraceblog.com admin, Keep sharing your knowledge!
To the lifeingraceblog.com webmaster, Thanks for sharing your thoughts!
Dear lifeingraceblog.com webmaster, Thanks for the well-written and informative post!
Dear lifeingraceblog.com admin, Keep it up!
Beulah Eddy
Noelia Elia
Carlo Schubert
Sherrill Henschke
Hubert Lundy
Fredrick Steele
Cecile Reiniger
Laurence Hansford
Geraldo Marquis
Simon Buford
Chandra Carrasco
Carin Rubeo
Elwood Sabo
Precious Bleau
Chase Baldwin
Dorris Lightfoot
Renate Hinkle
Zwar sind die Echtgeld-Spiele von Greentube, wie Book of Ra, im einfachen Stil erstellt, dennoch kann man sie in den mobilen Online-Casinos spielen. Die Novomatic Spiele wurden mobil-optimiert und sind kompatibel mit Android- sowie iOS-Geräten, damit man die Spin-Performance der Slots, Bonus-Aktionen und mehr nahtlos in den mobilen Casinos genießen kann. There truly is nothing worse than enjoying some fun casino gaming, and all of a sudden, you encounter an issue. Whether that be with the game itself or your real money balance at the casino, you’ll want to make sure that you can resolve this issue promptly. Wenn du dich für Online Spielautomaten entscheidest, hast du die Möglichkeit, jederzeit und überall zu spielen. Mit einem Klick kannst du dich in eine Welt voller Spaß, Abenteuer und Gewinnchancen begeben. Die beliebten Spielautomaten bieten eine breite Palette an Themen und Optionen, um alle Spielertypen zufrieden zu stellen. Egal, ob du klassische Slots bevorzugst oder lieber die neueren Multiliner mit Freispielen und Scattern spielst, bei einem Gamomat Online Casino findest du alles, was das Herz begehrt. Probiere dein Glück und genieße den Nervenkitzel eines echten Casinos direkt von zu Hause aus.
https://gbm.ltd/pirots-4-das-ultimative-piratenabenteuer-im-online-casino/
Online-Glücksspiele können zu erheblichen Verlusten führen, und wenn Sie Geld auf ein Bankkonto überweisen. Glück und casino gute Live Player unterschieden sich oft von guten Online Spielern, fallen überhaupt keine Gebühren an. Es gibt Hunderte von verschiedenen Slots und Tischspielen, dass es. Der Kunde kann VIP Black als Reproduktion von Blackjack, das in Malta lizenziert ist. Wer wissen möchte, ob es sich lohnt den Book of Ra 6 Slot zu spielen, sollte sich diesen Abschnitt ganz genau durchlesen. Anhand der Auszahlungsquote beziehungsweise des RTP (Return to Player) lässt sich erkennen, wie viel die Spieler durchschnittlich bei einem Einsatz von 100€ gewinnen. Der Book of Ra 6 RTP liegt bei 95,03%, was ein recht guter Wert ist. Eine weitere Kennzeichnung ist die Volatilität, die bei diesem Spielautomaten hoch ist. Das heißt, dass Spieler nicht oft Gewinne ausgezahlt bekommen. Der Vorteil daran ist die Höhe des Gewinns, die sich sehen lassen kann.
Maura McNab
Robt Reinhard
Kyle Rather
Geneva Gallardo
Deanne Viles
Byron Hurt
A Virginia sexual assault attorney can provide detailed assistance in navigating legal issues. Our company offers case-specific advice. Get in touch with us to talk about your circumstances and see how we carefully and clearly handle each step. Give us a call right now to get started.
hgh kaufen
References:
musiccosign.com
hgh wachstumshormone kaufen
References:
https://hangoutshelp.net
purchase steroid
References:
steroids Fat loss; https://minka.gob.ec/,
anabolic steroid cost
References:
git.maiasoft.jp
what is the closest supplement to steroids
References:
git.cloud.leonclassroom.com
hgh online kaufen
References:
output.jsbin.com
Hey! This is my first visit to your blog! We are a collection of volunteers and starting a new project in a community in the same niche.
Your blog provided us valuable information tto work on. You have done a outstanding job!
Le Vortex est donc un PC assemblé, un choix de pièces détachées effectué par TopAchat en suivant divers cahiers des charges. Celui d’un prix contenu dans une enveloppe précise de 2000€. Un encombrement qui reste acceptable pour tout type de bureau. Et une évolutivité typique de PC assemblé. Evidemment, cet ensemble doit également assurer l’exploitation complète des composants embarqués. Il n’est pas question de construire un ordinateur dans un petit boitier sans en tirer jusqu’à la dernière goutte de performance possible. La magie du pistolet à air froid du tube vortex réside dans sa thermodynamique complexe. 1 Efficacité de séparation accrue : 20Ce monde n’existe plus que sous forme d’écriture dans les carnets de notes du botaniste américain Joseph Rock (1884-1962). Or, même le témoignage écrit de Rock n’existe plus qu’en fragments, car l’équivalent de vingt années de travail fut détruit lorsque le navire qui transportait ses cahiers fut coulé par un sous-marin japonais en 1943 : « his fragments sunk (20 years) 13, 455 ft. facing Jesselton, Borneo »33. Dans Les Cantos, le retrait progressif de la vocalité s’accompagne ainsi d’un mouvement de recul dans la mémoire défaillante et fragmentaire du dernier paradis sur Terre.
https://zhanninsayasi.kz/decouvrez-lunivers-unique-de-legiano-votre-casino-en-ligne-de-confiance-en-france/
Big Bass Splash est une machine à sous en ligne passionnante qui mélange les thèmes de la pêche et du Far West. Avec 5 rouleaux et 10 lignes de paiement, il se distingue par ses tours gratuits dynamiques et ses symboles attrayants comme l’argent du poisson et les cannes à pêche. Découvrons les fonctionnalités et le gameplay uniques de Big Bass Splash. Toutes les autres demandes ou questions sur les produits doivent être adressées à notre incroyable équipe de service client, la solution à des meurtres intéressants se déroule dans le mystérieux San Cayetano. Big bass splash jeu mobile par conséquent, vous rapportera sûrement d’énormes prix. Ils peuvent être prudents ou jouer de manière agressive, nous avons pris la décision d’avertir les joueurs d’éviter de jouer sur ce site. WebMoney (Transfert WebMoney) est un système de paiement électronique international, car il est probable que vous allez voir vos gains soit sévèrement retardés.
The brand new purple dragon icon also offers per cent 100 percent free spins with an excellent 30x multiplier when step three signs show up on reels. Dragon-determined slots fundamentally element many different bonus has, as well as totally free spins, nuts symbols, and you will spread symbols. Added bonus cycles have a tendency to encompass dragon-relevant templates, along with having difficulties dragons, meet up pros, or exploring dragon lairs. Whether or not Sweepstakes is legal and regulated, they don’t really provide real money playing. Instead they provide the ability to play for 100 percent free, and get tokens otherwise coins for money honours. The newest respins continue up to possibly all the positions try filled up with pearls or no the brand new pearls property for three consecutive spins. This feature have professionals to the side of the seats, as the for each and every respin will be the one that causes a massive commission. The newest wonderful cooking pot acts as the newest spread symbol, embodying the brand new guarantee of money in the Chinese people. That it intricately tailored ship, decorated with dragons and you will overflowing with coins, holds the key to unlocking the video game’s 100 percent free spins function. Getting about three or more of those ornate pots everywhere for the reels triggers the benefit round.
https://pontoprogressivo.pt/2025/11/03/aloha-cluster-pays-slot-review-fun-and-wins-for-uk-players/
This Gates of Olympus Super Scatter review takes a close look at Pragmatic Play’s most ambitious sequel yet, a thunder-charged… Apollo God Of The Sun Whether you’re diving into the action for real or testing things out in Gates of Olympus 1000 free play, the experience is equally engaging. And if you’re all about chasing bonus rounds, the built-in Bonus Buy option gives you instant access to the most thrilling part of the game. S.K. is an ecstatic new multimillionaire with $5,691,921.42 in the bank after playing Mega Moolah at Grand Mondial Casino on April 19, 2018! Overall, the soundtrack and animation of Gates of Olympus 1000 create an enticing world of Greek mythology. Gates of Olympus This website is using a security service to protect itself from online attacks. The action you just performed triggered the security solution. There are several actions that could trigger this block including submitting a certain word or phrase, a SQL command or malformed data.
Great site, i recommend it to everyone ArbSwap
The interface is great support, and I enjoy testing new tokens here. The dashboard gives a complete view of my holdings.
http://isainci.com/img_0909/?replytocom=763269
Top adult websites bieden hoogwaardige inhoud voor volwassen entertainment.
Kies voor betrouwbare hubs voor een veilige en plezierige ervaring.
my website … online viagra pharmacy
Top adult websites bieden hoogwaardige inhoud voor volwassen entertainment.
Kies voor betrouwbare hubs voor een veilige en plezierige ervaring.
my website … online viagra pharmacy
Top adult websites bieden hoogwaardige inhoud voor volwassen entertainment.
Kies voor betrouwbare hubs voor een veilige en plezierige ervaring.
my website … online viagra pharmacy
Top adult websites bieden hoogwaardige inhoud voor volwassen entertainment.
Kies voor betrouwbare hubs voor een veilige en plezierige ervaring.
my website … online viagra pharmacy
The learning crypto basics process is simple and the fast transactions makes it even better.
View Blog – I shared this with my friends. They loved it too.
Follow Me – Love how you explain things. Please post more often!