• Skip to main content
  • Skip to primary sidebar
life{in}grace

life{in}grace

live with more presence, passion, & purpose

  • Home
  • About
    • Contact
  • Work with Me
    • Courses
    • Life Mentoring School
    • LIVE Event – Your Best Beautiful Year – January 4, 2020
  • Natural Healing
    • Get Started
    • Essential Oil Resources
  • Free Resources
  • Podcast
  • Books

crafts

DIY Pom-Pom Wreath

December 7, 2012 by Edie Wadsworth 44 Comments

If you’re new around here?  Thank you for visiting my blog!  I’m honored you’re here and I hope you’ll find some encouragement (and some laughter!) for your days.  Join this community of grace lovers and get fun, free stuff every month delivered to your inbox, along with access to free printables, meal plans, and my 31 Days to A Heart of Hospitality ebook!

For a tour of our house this Christmas season, click here!

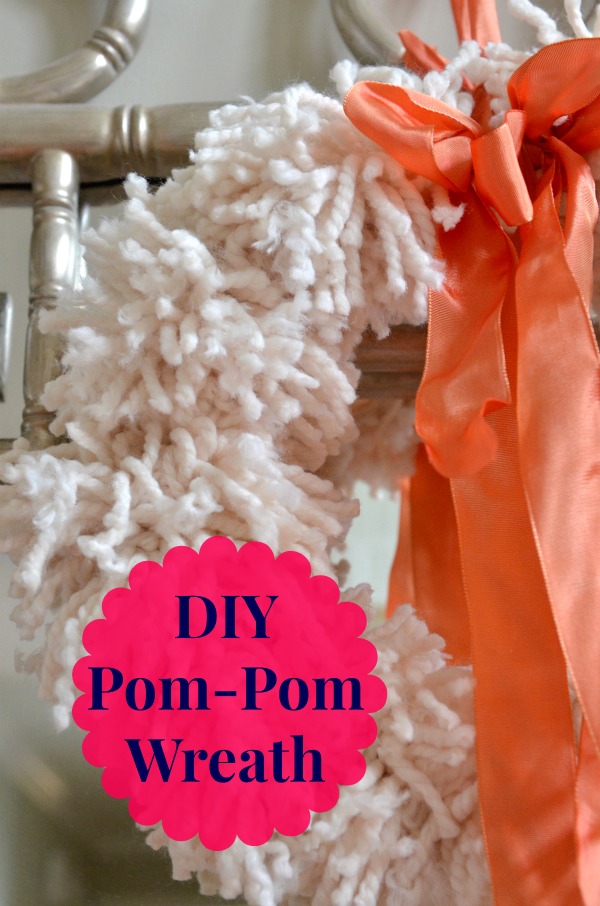
And now, for the wreath……..

My jaw dropped the first time I saw the snowball wreath from Anthropologie.   It’s beautiful——of the drop dead gorgeous variety.   And it’s $298.

Then my friend Nester posted about her snowball wreath.  Which is all kinds of awesome.  Just like she is.  I knew I had to find a cheap, easy way to do it.

Side note:  She’s the cornerstone of my internet world.  Hers was the first blog I stayed up until 3am to read ALL the archives from.  I love everything she does.  I love seeing the world through her eyes.  I love  that she works hard but also guards her margin. After our house fire in 2010, she made a video for us that I’ve watched over and over again and has been such a source of healing for me.. And then I couldn’t believe it when she did this for our rebuild.  I adore her and feel privileged to call her friend.   I hope she knows how much we all appreciate her generosity and her willingness to use and share  her gifts.  She’s one of a kind.  And she’s hosting this Christmas crafting shindig, which will inspire to make something beautiful this weekend.  And while you’re at it, visit Cate’s crafty party too.  Let’s just party in glue sticks and yarn and pretty fabric all weekend, whadaya say?

(I recently hosted a 12 Days of Christmas crafting and you’re looking for great tutorials for gift making!)

Now, back to the wreath.  First, you’ve got to make 10 or 12 pom poms.

Here’s what you’ll need:

2 skeins of chunky yarn

1 10 inch string of yarn

10 inch wreath form (or whatever size you wanna make!)

scissors

a piece of cardboard ( I used a 2×4 inch piece but the bigger you make it, the larger the pom-pom.


Place the ten inch string through the slits so that there are equal tails on each side. (When you make the pom pom, you will use the tails of this string and tie them into a tight knot around the wound string.)

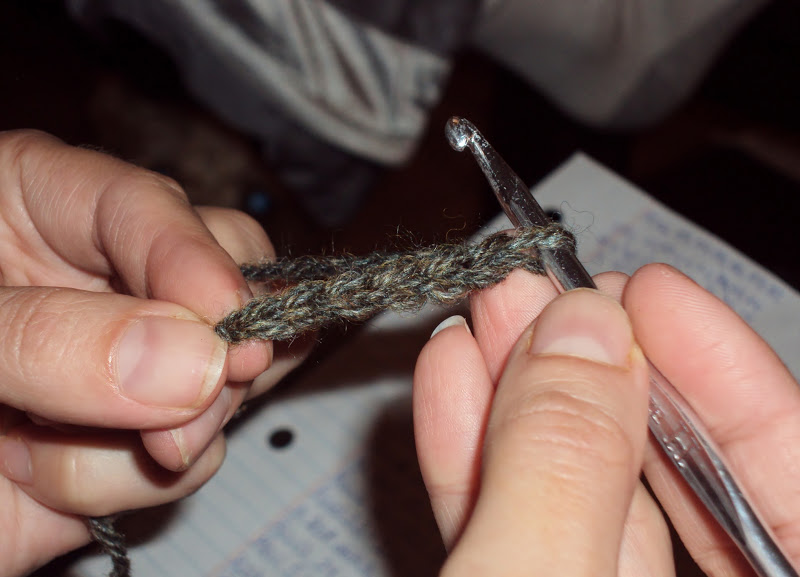
From the full ball of yarn, start wrapping around the cardboard. The more you wrap, the puffier your pom pom will be. I wrapped my chunky yarn about 100 times for my snow ball pom poms. If your yarn is normal weight (thinnish) you may need to wrap 150 times to make full pom poms.

Once you’ve wrapped it as many times as  you like, take the two tails from the string that is in the slits of the cardboard and pull them up around the ball of yarn.

Gently slide the yarn off the cardboard, holding the tails up and being careful not to let them slip out from in between the newly formed ball of yarn.

At this step, you now have  a ball of yarn with a string in the middle.  Most tutorials will tell you at this step spread the yarn out towards the ends of the string.  I didn’t do that.  I just tied a tight knot in the string and double knotted it for extra security.

Then insert your scissors through the middle of all those loops you wound and cut right through them.

And tada!  You have a snowball pom pom!

You can give him a trim if he’s got some straggly uneven spots.  We also pulled the ends of the yarn apart a little to make it look a more frayed and cozy.

Now all you need to do is make a dozen of those and  attach them to the wreath.  I used a 10 inch straw wreath form and it took exactly 2 skeins of  yarn to fill it up.  You could hot glue them or just wrap string around them and tie them on.  I chose the latter because I’m a little lazy with my crafts and didn’t feel like firing up the glue gun.

This project took about an hour an a half , cost about $14, and was definitely worth the explosion of yarn and fuzz in my schoolroom.  Actually, the girls did 90% of the work, while I flitted around with a host of other (very ordinary) things, including my collaborative mantel project.  The girls did a great job!


And for all you friends who gave it your all trying to help me with my Christmas mantel, I want you to know that I had paint on my grannie pj’s by 5:30 this morning.

I was mixing paint like nobody’s business.

Check out the coral-ish/pinkified/sal-mon colored mirror here!

diypompomwreath

Filed Under: crafts, DIY, holidays, tutorials Tagged With: diy pom pom wreath

12 Days of {handmade} Christmas::Day 12 Hello Darlin’ stenciled pillow and making an envelope pillow

November 13, 2012 by Edie Wadsworth 14 Comments

This is the LAST DAY of a 12 days series of {handmade} Christmas tutorials.   Can I get a woot-woot?   Make sure to check out the all the projects for 2012, 2010, and 2009!

And I’m hosting myself. Which is why I’m late.  Fancy that.

********************

You know those greeting cards that play music when you open them?  Well, I want to expand on that theme except that I want music to start playing when you open my front door.

What music, you ask?

“Hello, Darlin’ ” by Conway Twitty, of course.

How awesome would that be?  You walk into my front door and all sounds stop except for Conway Twitty blasting out,

“Hello darlin’, nice to see you, it’s been a loooooong  tiiiiiime.  You’re just as lovely as you used to be.”

Can anybody come wire my house to do that?  Pretty please?

Until then, I’ll just have to make do with my  Hello Darlin’ pillow.

So, next time you come to visit, I hope you feel the warm welcome that only ‘Hello, darlin’ can bring.
This tutorial is an attempt at combining this tutorial for stenciling pillows and this very easy tutorial for making an envelope pillow!
Here’s what you’ll need:

stencil of your choice—mine are  1 1/2 inch stencils by Martha Stewart’s from Micheal’s  (buy  your favorite font, size)

fabric markers—i bought Sharpie’s brand from Amazon.

a pillow cover (blank linen) or just a piece of linen or canvas or cotton fabric cut to the size you want  (directions for mine to follow)

a self-healing mat

a rotary cutter

a pencil

a ruler  ( I have a lip-edged ruler which has transformed my sewing projects.  I LOVE IT!)


Here are a few basic instructions:

Decide on your quote.  Which is easy.  Hello darlin’ cannot be improved upon, can it?   We also made one (or at least Elea did) that says, “You are my sunshine.”

Decide on your spacing.    I made a 20×20 pillow cover for this one and once we cut our material, we just laid out the letters and decided how we wanted the spacing.   We used a ruler to generally keep the letters straight but I’m not a perfectionist so I don’t waste too much precious time ciphering about it.

As a matter of fact, my 10 and 12 year old did all the work—–the tracing with pencil………

and filling in with the fabric markers.

Then you’re ready to make the pillow cover.  This is the easiest pillow cover in all of creation.  I’ve been making these for years but I found Jenny’s tutorial so easy to understand so I’ll adopt her method of doing it from now on.

You’re basically going to cut a long strip of fabric which you fold over the pillow like an envelope and then sew on the top and bottom.

For a 18 inch square pillow (which I used to demonstrate the technique), I like to make my pillow cover a inch or so smaller so it will fit tight.  This works especially well with down inserts, which are much more smush-able when you’re squeezing them into tight spots.

So, for this pillow I cut a piece of fabric 18×42  piece of fabric.

Lay the fabric out so that the longest part is horizontal.   Fold over both ends about a half inch (on the 20 inch ends) , iron them and then sew the edges down.  This makes the ends look more finished.  I don’t know why I did a zig zag stitch here.  I usually don’t.  Just do a straight stitch.

After doing that to both ends, fold the ends in with your fabric right side in, like an envelope.

Once you fold both ends over onto each other, use your ruler to decide how wide you want the pillow to be.  I want mine to be 17 inches wide because my pillow insert is an 18 inch square and I want to have to squeeze the pillow in and then fluff it around, giving it a taut appearance.   If your insert is 20 inches and you want it to fit not-so-taut, then make it 20 inches at this step.  So my ends are folded over, overlapping a few inches with my total width being 17 inches.   Now, all I have to do is sew up the top and bottom of the fabric and we’re done.  You can turn the pillow cover to the right side through the opening where the fabrics overlap.

When you sew up the ends, using a 1/2 inch seam allowance, and then turn it to the right side, it looks like this.


Once you get the hang of these, you can make them in less than 15 minutes.

Here’s how it looks by the Hello Darlin’ pillow.

See how the sides of the pillow aren’t sewn?  That’s where you folded the fabric over.  The top and bottom are sewn, which makes it the simplest pillow cover to make the entire world!

And in case you need a Conway Twitty tutorial……..


Filed Under: crafts, DIY, sewing, tutorials Tagged With: stenciled pillow

12 Days of {handmade} Christmas Tutorials::Day 9 DIY Felt Scarf

November 10, 2012 by Edie Wadsworth 17 Comments

This is day 9 in a 12 days series of {handmade} Christmas tutorials.  You can find all the projects here!

Welcome my friend, Julie, from Less Than Perfect Life of Bliss, today as she shows us how to make a felt scarf!  Julie is beautiful, talented, with a wonderful family and especially wonderful parents, that I adore.  Her dad is a great preacher and was the first person to ever share the gospel with me and he will always be special to me for that.  Her mother,  Denise, is precious and blogs at Counsels of the Heart .  Julie’s sister, Amy,  has a great crafty blog that I’m sure you’d enjoy.  Talent seems to run in the family.  Thank you, Jules, for sharing with us today!

I’m genuinely honored that Edie has invited me to be a part of this series this year and I can’t wait to show you how to make this felt scarf.  It’s a quick and easy project, no matter what level of crafty you are.  


DIY Felt Scarf

diy felt scarf


Start with 1/4 of a yard of 72″ wide felt, and cut approximately 8″ off of one end.


Then, simply sew a couple of buttons onto one end of the “scarf” and carefully cut some button holes into the other end.


At this point, you’ve spent less than 10 minutes on a great little neck warmer.  Just wrap it twice around your neck, button it up, and you’re done!


Or, you can choose to wear it another way by creating a matching felt flower pin from the extra 8″ you cut off.

To do this, cut a circle approximately 3 inches in diameter. Then, cut about 30 leaf-shaped petals, approximately 2.5 inches long.


Then, just hot-glue them on in layers, overlapping them as you go, using the same technique as you would for a felt flower pillow.


To make the center, fold 2 of the petals in half, placing a dot of glue in the fold to hold it together, then stand them up and glue them into the center.


Glue a pin mechanism onto the back and you can wear it on your scarf or with what ever you want.


For this look, just button the scarf in the back and pin the flower on the front!


To make a child’s version, just cut the felt to the length needed to best fit them.


I hope you like this as much as I’ve enjoyed sharing!  It’s a great little idea for a simple, homemade Christmas gift. And since each of these only cost about $3 to make, it’s great for any budget.  


Filed Under: 12 Days of Christmas tutorials, crafts, DIY, tutorials Tagged With: diy felt scarf

12 Days of {handmade} Christmas Tutorials::Day 8 Crocheted Headband/Ear Warmer

November 9, 2012 by Edie Wadsworth 5 Comments

This is day 8 of a the 12 days of {handmade} Christmas tutorials.  The landing page where you’ll find all the projects can be found here!

My name is Ruth and I blog at Farmgirl In My Heart.  I am thrilled to be here on Edie’s blog,  sharing one of my favorite things.    

Today we will be working on a crochet ear warmer.   The cold days will be here rapidly, for some of us they already  are.  Ear warmers work for those who are not hat people. They are everywhere recently.  These are quick and easy to crochet and make fantastic gifts.  You will need a basic knowledge of crochet stitches to work on this project.  The stitches required for this project are chains(ch) and single crochets(sc).  Both  are beginner stitches and you can find basic crochet tutorials on You Tube and Google.  Lion Brand and Red Heart yarn both have Learn to Crochet tutorials on their sites.


To begin this project you will
need: one skein of yarn (size 3 or 4) and a size H hook.  You can read about yarn weight from the
Craft Yarn Council.
To begin this project you will
ch (chain) 6 sts (stitches).

Row 1:  Sc in the 2nd stitch from the hook
and in each chain across; turn-5 sts.
Notice the 2nd
stitch in the photo.  This is where you
will begin your sc stitches.

Row 2-8: Chain 1; sc across
evenly, turn-5 sts.
For these rows you will
crochet one stitch in each of the previous stitches.  At the end of the row you will turn your work
and ch 1.  Repeat this step until row 8.
Row 9-Inc.:  Ch 1; 2 sc in the first st, sc across to last
st, 2 sc in the last st; turn-7 sts
Unfortunately, this picture is
not the best.  You will work two sc in
the first stitch of this row.

and in the last stitch of the
same row.  When you are finished there
should be 7 sts.


Rows 10-16: Ch 1; sc across
evenly, turn.
For these rows you will
continue to single crochet in each stitch across the row.  Turn and repeat.  Beginning each row with a chain. 
Row 17-Inc: Ch 1, 2 sc in the
first st; sc across to the last st 2 sc in the last st; turn-9 sts
You work this row as the
previous increase rows.  There will be 2
stitches in the first and last stitch of the row. 
The gradual increases should
be visible in your work. 
Rows 18-24: Ch 1; sc across
evenly, turn-9sts.
Your work should look like
this:
(excuse my scribbly pattern in the background)
Row 25-Inc: Ch 1, 2 sc in the
first st; sc across to last st, 2 sc in the last st; turn-11 sts
Rows 26-32: Ch 1; sc across
evenly, turn-11 sts


Row 33 – Inc: Ch 1, 2 sc in
the first st; sc  across to last stitch,
2 sc in the last st; turn 13 sts.


Rows 34-50: Ch 1; sc across
evenly, turn


Row 51-Dec: Ch 1, sc2tog, sc
across to last 2 st, sc2tog-turn 11 sts
For this row you will begin to
decrease.  For the first st you will work
2 sc together.  You can go
here for instructions to complete
this stitch. 
To crochet to stitches
together you will insert the hook through the first st, yarn over the hook,
insert hook in next st, yarn over and pull up a loop, there will be three loops
on hook, yarn over and pull through all three loops on hook.  First decrease st made.


Rows 52-58: Ch 1; sc across
evenly, turn
You will begin to notice the
gradual decrease in your work.  It should
resemble this
You are able to see the
gradual thinning.  You will now continue
this pattern for the following rows.
Row 59-Dec: Ch 1, sc2tog, sc
across to the last 2 sts, sc2tog: turn-9 sts.
Rows 60-66: Ch 1; sc across
evenly-9 sts.
Row 67-Dec: Ch 1, sc2tog, sc
across to last 2 sts, sc2tog; turn-7 sts.
Rows 68-74: Ch 1; sc across
evenly- 7 sts.
Row 75-Dec: Ch 1, sc2tog, sc
across to last 2 sts, sc2tog; turn- 5 sts.
Once you have completed the
decreases, your rows should have 5 sts. and look similar to this.

Rows 76-82: Ch 1, sc across
evenly, turn. 

At this time you can try the
headband on.  If it seems that the
headband may be too large you can subtract a couple of rows from above, if it
is seems to be too small you can add a couple of additional rows.  We will be adding additional rows and making
two buttonholes so it will be adjustable.
Take this
into consideration when you
try it on.
The buttonholes may sound
difficult but in crochet they are very simple.
Row 83-Buttonhole:  Ch 1, sc in first 2 sts, ch 1, skip next st,
sc in next 2 sts, turn.
Unfortunately, this is a bit
blurry, but you can see that I have sc in the first 2 stitches, then I ch 1,
you will skip the next st.

and crochet in the following
one.  You can see the space this
leaves.  That is the completed
buttonhole.

Rows 84-86: Ch 1, sc across
evenly, turn

At this time you will crochet
through each st and over the space for the buttonhole.
Row 87 Buttonhole: Ch. 1, sc
in first 2 sts, ch 1, skip next st, sc in next 2 sts; turn
This second buttonhole will
make the ear warmer adjustable and better suited for gift giving. 
Row 88-90: Ch 1, sc across
evenly-do not fasten off.
Finishing: Ch 1, sc evenly
around edge of headband; join to first st. Fasten off.
Turn the ear warmer sideways
you will now crochet a sc st around the outside edge of the piece.  This will neaten the edges.


You will continue around the
piece until you reach the beginning.
Once you have reached the end
you will fasten off.  You can view how to
here.
Then using a yarn needle you
will tuck in the ends of your yarn.
Add a button to the end
opposite your buttonholes.


These ear warmers can be
embellished with crochet roses, or any other flower.  A bow is a fun alternative if you do not like
the flowers or have not reached that level of skill.  
 Ear warmer embellished with
flower.                


   Headband embellished with bow.
  For a great gift idea you can
make several embellishments, different color flowers and bows, to create fun styles.
                                                                                                                                                                                          
I will be posting some fun
crochet flower tutorials and bow tutorial on my blog so come on over and see all the fun
possibilities for embellishing your ear warmer.
If you have any questions,
stop by, I will be glad to help.

Filed Under: 12 Days of Christmas tutorials, crafts, tutorials

12 Days of {handmade} Christmas Tutorials::Day 6 Embellished 3 Tiered Stand (and a giveaway!)

November 7, 2012 by Edie Wadsworth 19 Comments

This is day 7 of the 12 Days of {handmade} Christmas tutorials! For an overview of all the projects, click here!

Hi everyone! I’m Teresa McFayden, a Mixed Media Artist from the heartland of America, Omaha. I am a married Mom of 3 great children, ages 21,18 and 14. For the past five years I have been teaching hear and there around the country and love to teach online workshops. That way I get to connect with lots of people all over the world! I love what I do!
I am so delighted to be part of Edie’s 12 Days of Christmas and seeing what she has in store for us. I look forward to sharing this tutorial with you! It’s simple to do, and can add a festive flare to any of your holiday settings.
Be sure to enter the giveaway for my Best of Christmas E-Workshop! This online workshop features over 40 of my favorite holiday art and craft projects. It’s sure to inspire you and your family!
I invite you to check out my site at www.teresamcfayden.com
Wishing you a blessed holiday season!


Friends and family gather together this time of year. Bring out your best and celebrate with some sweet treats. Embellish a platter perfect for entertaining your guests.

 Embellished Christmas Platter

embellished Christmas platter

Wouldn’t this be a fun platter for any celebration…birthdays, graduations, etc.?

What to Gather:

Platter or cupcake stand

Graphics (or coordinated die cuts)

Coordinated ribbons in various widths

Twine or string

Hole Punch

Glitter, optional

Embellishments (see sample for ideas)

I’ve gathered some vintage graphics for us to use for this project, courtesy of Graphics Fairy.

Right click on jpg below, save and print on highest quality setting. Print on cardstock. This graphic is 8×10. Print two copies for this project.

12dayspostcards

Or download the PDF here: Download 12dayspostcards


This 3 tiered platter came from Target, but you can find them almost anywhere. Cupcake tiered stands are perfect for decorating, too. Especially a 4 tiered one. I love how this Target platter has the rod iron ring at the very top, which will be fun to hang everything from.

IMG_1965

After printing your graphics, adhere to cardstock or patterned paper.  Adhere one graphic on the front of the cardstock and one on the back. So they are 2 sided, because they will be seen from all angles.

Hole punch each graphic at the top and bottom.

IMG_1967

Thread twine, string or ribbon through the holes. Knot the twine after stringing it through each hole to keep it secure. Space the graphics out so they will cascade down the side of the platter.

Add glitter here and there if you like.

IMG_1969

Make two of these graphic streamers…one will cascade down the left and one down the right. Leave extra twine on the top for securing to platter.

While waiting for the glitter to dry, tie various ribbons to top of platter.

IMG_1970

Clip 1″ pieces of garland and hot glue to ribbon, on both sides of the ribbon. This makes a fun accent.

IMG_1972
I added a string of bells to one side of the platter. Evergreen or any holiday pick would be great here. A red strand of ribbon was hung on each side of the platter.

IMG_1973
Before you guests arrive, fill up the platter with sweet treats…appetizers, hot cocoa fixin’s…whatever!

IMG_1986

It makes a great centerpiece, or focal point amongst smaller dishes or trays, too. Are you starting to get hungry?

IMG_1990
I’m smiling now because I know my family will love this! This will be their favorite project I’ve made for this E-Workshop…I just know it.

IMG_1991

Tell us your favorite Christmas homemade candy/treat for a chance to win a free E-Workshop!  We’ll pick five winners.  It’s your lucky day!

Filed Under: 12 Days of Christmas tutorials, crafts, DIY, tutorials Tagged With: tutorial for embellished Christmas platter

12 Days of {handmade} Christmas:: Day 5 Book Page Christmas Tree

November 6, 2012 by Edie Wadsworth 20 Comments

Note to bookclubbers—I haven’t forgot about you!  The Antigone post is up today, courtesy of my darling friend, Michele.  I’m hoping to add a short video introduction to Plato to that post later today!  I LOVE LOVE LOVE Plato’s Republic.  Don’t be scared.  This is a good one.  Start reading today, if you haven’t already.

This is day 5 in a 12 days series of {handmade} Christmas Tutorials.  There’s a handy landing page of all the projects here and don’t forget to check out the projects for 2009 and 2010.
Hello! My name is Stephanie and I blog over at homespunstephanie. 
I am new to this world of blogging but have been a “blog stalker” for quite some time and decided that enough was enough and it was time to jump in with both feet!! 

I have followed Edie since I began “blog stalking” and was so over the moon when she selected me to be a guest blogger for her annual: 12 days of {Handmade} Christmas!

Grab a cup of coffee and gather all of your old books
so you can get busy creating your very own Book Page Christmas Tree!!

Book Page Christmas Tree How-To
Supplies Needed For Project:
4 inch clay pots 
Florist’s foam
Wooden Skewers
Sheet Moss
Old Book
Paint
Sanding Block
Hot Glue Gun


Step 1:  Paint your clay pots with your desired color. I found the colors “Cool Blue and Leafy Green” by DecoArt look the best once sanded. Painting does not have to be perfect since you will be sanding the pots down a bit once they are all dried.


Step 2:  Once pots are completely dry use a sanding block 
to rub some of the paint off to give them an aged or chippy look.


Step 3:  Using an old book cut out square pieces of paper starting from 4 1/2 inches and decreasing the size by 1/2 at a time. You will need more 4 1/2 and 4 inch squares so cut plenty of these sizes.


Step 4:  Place florist foam inside of the clay pot-you may have to trim around the edges so it fits snug in the pot.  Once florist foam is secured stick a skewer in the middle.


Step 5:  Using a hot glue gun cover the florist foam 
with moss-this is messy!!


Step 6: Start pushing the squares of  book pages onto the skewer.  Begin with the biggest squares at the bottom and continue moving up the skewer to the smallest squares at the top. As you are adding your book pages to the skewer it will begin to look like a tree!


Completed Project:


book page Christmas tree


Enjoy!!
Stephanie @ www.homespunstephanie.blogspot.com

Filed Under: 12 Days of Christmas tutorials, crafts, DIY, tutorials

  • « Go to Previous Page
  • Go to page 1
  • Go to page 2
  • Go to page 3
  • Go to page 4
  • Go to page 5
  • Go to page 6
  • Go to Next Page »

Primary Sidebar

ediewadsworth

Coach. Healer. Life Mentoring School.
💕💕I help women heal & rediscover their purpose & calling.💕💕 Click below for my free purpose field guide!

Dr. Edie Wadsworth|Lifeingrace
2 years ago today, your world shattered into a mil 2 years ago today, your world shattered into a million pieces.

Sometimes I marvel at how we were blessed enough to be there holding you when it all came crashing down. I do know this—I can’t remember my life without you.

I do know that thousands of tears and meals and boo-boos and toy trucks later, we stand in awe of you---your courage, your brave big boy fight, your tender little boy heart, your hilarious old man ways. 

We know how sacred this walk with you is and we don’t take it lightly.

We are here for it all and we couldn’t be more grateful.

We have always loved you and you have always been our special gift.

 Love you little one. Let’s keep listening for Aslan. He will find a way to put everything back together. 

“Herein lies the world. Beautiful and terrible things will happen. Do not be afraid.”
Hiring these two out for all your ring bearer and Hiring these two out for all your ring bearer and flower girl needs.  They provide ample entertainment to your guests and accept plush toys for payment in lieu of money. May or not be VERY strong willed.  And also adorable. @williamsperformance @ginawilliamsh @ameliadurand4
I turned 51 last week and spent a much needed few I turned 51 last week and spent a much needed few days alone with this guy.  As soon as we drove out of the driveway I started crying. I don’t think I realized how much I needed a break.

it was incredible and relaxing and amazing and so life-giving. 

this week it feels like last week was 100 years ago because you know, life. 

I am excited to say that despite the fact that I’m another year older I managed to figure out how to go live on YouTube with my new camera. It only took me approximately 6000 hours. So maybe you’ll join me at noon today on YouTube and we’ll try something new together.

Here’s to 2021. Maybe it will get its act together but if it doesn’t we will get ours together😂🥳❤️❤️❤️
“To have Faith in Christ means, of course, tryin “To have Faith in Christ means, of course, trying to do all that He says. There would be no sense in saying you trusted a person if you would not take his advice. Thus if you have really handed yourself over to Him, it must follow that you are trying to obey Him. But trying in a new way, a less worried way. Not doing these things in order to be saved, but because He has begun to save you already. Not hoping to get to Heaven as a reward for your actions, but inevitably wanting to act in a certain way because a first faint gleam of Heaven is already inside you.”
― C.S. Lewis, Mere Christianity
Got my halo yesterday🤩😇😂 (That ridge lin Got my halo yesterday🤩😇😂

(That ridge line right above my head is the infamous Angel’s Landing)

Here’s to climbing out of tough spots in 2021❤️
What I learned in 2020?? I am HERE FOR ALL THE L What I learned in 2020?? 

I am HERE FOR ALL THE LOUNGE WEAR. 

Amen. Goodnight. 🤩🤩🥳🥳🥳 

Okay fine. Currently sporting sweater from Target which I have worn everyday for 3 months.  Natori PJ’s which I HIGHLY recommend, and Ugg slippers which I’ve worn everyday for a solid year. 

How’s your lounge wear game?? Tell me everything.
Day 2 of LIVE YOUR DREAM starts in 30 min. We’ll Day 2 of LIVE YOUR DREAM starts in 30 min. We’ll be talking all about DESIRE and the difference between false desire and true desire and how true desire leads us to our calling. 

It’s not too late to join us and if you could see the comments inside this group, you would 😭😭😭 and 🥳🥳🥳 because we are getting to the heart of things and it’s only gonna get better! 

If you’re already in, tell us how yesterday’s training impacted you and if you’re not, JOIN US FRIENDS!!

Head over to https://lifeingraceblog.com/dream
We took Tommy boy for this first ski adventure tod We took Tommy boy for this first ski adventure today and it was so satisfying to see him tackle something hard and keep his chin up and have a BALL doing it.

He was very entertaining to his ski school friends, despite the fact that his German instructor couldn’t understand a WORD he said. 😂🥳

But all you mamas out there can see through all the pretty pictures and videos to know that days like today can also be full of frustration.

Making sure everybody has their stuff, the reservations, the snacks, the HASSLE of boots and poles and gloves and skis, the tears, the snappy replies, the hurt feelings, the wrong turns, the missed moments, the potty breaks.

NEED I GO ON??????

But then there’s the down to your soul goodness of being smack dab in the middle of God’s glorious creation, the sheer joy of the wind and sun on your face, the fleeting feeling that everything is right in the world, the triumph of tackling something hard and pushing through all the doubt and fear.

I felt every emotion today. What a privilege to live this life we’ve been given. What grace to live it with these people.

Today was a dream. But like every dream come true, it has a cost, it requires more of you than you think it will. You will want to quit.  A million times.  But what waits for you on the other side is worth fighting for. 

That’s what we’re diving into this week in my online workshop LIVE YOUR DREAM.

You may have given up on setting goals, but don’t stop dreaming.

Come dream with us and let’s make 2021 the year we were willing to be so alive that we would risk feeling EVERY emotion, every setback, every failure in order to see it come true.

We start tomorrow.

It won’t be the same without you.

Join us at https://lifeingraceblog.com/dream.

It’s time to dream again.
❤️❤️❤️❤️❤️❤️

What’s one thing you’re dreaming about this year???
It was magical. ⛄️⛄️⛄️ Know what’s It was magical. ⛄️⛄️⛄️

Know what’s more magical for me???? The week between Christmas and the new year and I’ve made it even more epic by hosting an online workshop called LIVE YOUR DREAM🥳🥳🥳🥳

This one is for the dreamers and the doers!! Join me at lifeingraceblog.com/dream and let’s make some magic❤️❤️❤️❤️

Tell us in the comments if you’re already in!!!
  • Facebook
  • Instagram
  • Twitter

© Copyright 2008-2019 life{in}grace · All Rights Reserved · Graphic Design by Jenna Riccio Laible · Website by Erin Ulrich