

If you’re new to the ’12 Days’, you may visit the previous days by clicking on the day you of your choice:
Day 10 Cinnamon Honey Butter and Toffee Popcorn
It has been a wonderful ’12 Days’ and although I’m sad to see it end, I can’t think of a better grand finale than my sweet and funny friend Darby from Fly Through Our Window. I was her number one blog stalker last year when I decided to ask her to be part of the first ’12 Days’ series. She was so gracious to do not one but two tutorials last year! (dishmat and Christmas tags) I have used both of them to death and more importantly have begun to cultivate a friendship that has so enriched my life. And just to give you a sense of her personality, when I asked her a picture of her to introduce her for the tutorial, this is what she sent me. I nearly spit my coffee onto my computer. This my friends is Darby-Doll and you’ll need to visit the blog to see all of her various adventures. See why I love her? I can’t thank her enough for all the hard work she put into this tutorial. I am forever grateful. I hope she’ll agree to teach us every year!
And now for a proper introduction (strikingly similar to last years’!)………..

Please make welcome the ever gifted Darby from Fly Through Our Window. Her blog is a treasure of great resources from how to make crock pot apple butter {which I’m currently eating} to how to make a professional looking roman shade. Through her exquisite photography, we get to ‘fly through her window’ and be blessed by her mother-love, her refreshing perspective on being a follower of Christ and her abundant tips and tutorials on all things ‘home’. She is the mother of three adorable children, wife to Justin–her college sweetheart and archeologist, a member of a PCA church {her motto is ‘I’m a big sinner with a bigger Saviour’}, twin sister to Erika {interior designer—whose blog I also love} and we are so blessed she has opened her life to us through her wonderful blog. Darby also recently opened an online shop with the cutest toddler tees evah! Check it out at Honey Bees Tees!
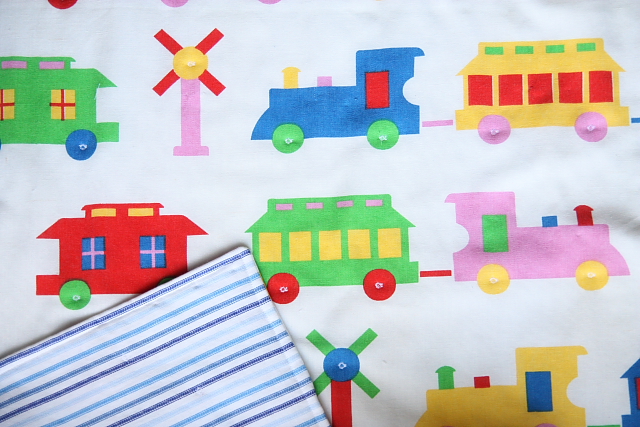
When Edie asked me to contribute I knew I wanted to make something using the vintage Marimekko curtain panels that I found at a thrift store over a year ago {for $4} I just wasn’t quite sure what I wanted to do with them. I was going to make a “Santa Bag” out of them to put the kids Christmas presents in but it saddened me to think about seeing the bright colored trains only once a year… so something more “useful” was definitely in order, and that is how I came up with this. It would make a perfect gift for your own family or for loved ones you might need a “family gift for”!
Here’s a little disclaimer before I begin. I had a friend here while I worked one day {and I just might have put her to work too, trimming selvages and fusing the fleece to the fabric} and she asked, “Darby, please tell me you are not going to tell your blog readers this is easy?” Well, because she’ll call me out if I tell y’all this is easy… I better say it’s an intermediate sewing project that might require a babysitter or helpful husband to watch the kids. There are really no difficult sewing techniques required, it is just a little involved time wise. That way no one cusses me when they think they can crank out a picnic blanket in 30 minutes! Ok, good.
The finished blanket is really BIG {88″ wide x 63″ tall} and perfect for picnics. It has a top layer {trains for me}, a layer of fusible fleece in the middle, and a sturdy layer of {fun & blue} ticking stripe on the bottom and is complete with coordinating ties so it’s easy to transport to and from your favorite picnic spot. You may choose what ever fabric you like but I do suggest something a little more stable {like a lightweight canvas, ticking stripe, or upholstery weight for the bottom}. Be sure to watch sales at your fabric stores because the ticking stripe was 1/2 off and I bought nearly 4 yards for just $16!

Before I start: PINS ladies PINS… they make your sewing neater and easier {especially with layers}… don’t omit them! 🙂
Here’s what you’ll need:
3.5 yards of 44″ wide fabric for the top of the blanket {I used trains}
3.5 yards of 44″ wide fabric for the bottom of the blanket {I used blue ticking stripe}
1/4 yard of 44″ wide fabric for coordinating ties {I used red gingham}
3.5 yards of 44″ wide fusible fleece
1: prewash and dry all fabric and trim off selvages
2: Measure down 63 inches on the top piece of fabric and cut all the way across the width. This will leave you with 2 pieces of fabric 63″ x 44″. Do the same with the bottom piece of fabric.
3: Take the two top pieces of fabric and place them on top of each other with right sides together {doing your best to match up any pattern that might be on your fabric, which also might require you to trim the tops and bottoms once you’re all lined up}. Using straight pins pin down one of the {63″} sides {right or left side it doesn’t matter, just don’t stitch along the top or bottom} and straight stitch. Press seam open.

4: Repeat step 3 for the bottom piece of fabric, doing your best to line up any pattern the fabric may have.
5: Now you should have two pieces of fabric that measure 63″ x 88″, one will be your top and one will be your bottom.
6: Following the instructions on the fusible fleece, iron the fusible fleece to the wrong side of the bottom fabric.


7: Lay the fused bottom fabric and top fabric right sides together– don’t pin and stitch yet… you need to make and insert your ties!

8: To make your ties: First, trim off the selvages on the end. Cut 2 pieces of fabric 4″ x 44″. Fold in half and press. Fold the top down towards your center crease about 3/4″ and press and then press the bottom up 3/4″ and then fold in half again and press. Tuck both ends under and pin all the way down the length of the tie and stitch completely around… both ends should be finished because you will fold your long ties in half when tucked into the blanket seam.

j
: Place your ties {folded in half} between the layers of the blanket on the top right hand corner of your fabric measuring down 4.5″ and then place the second folded ties 10.5″ down from the top.
10: Pin the ties in place {they should be lying inside the blanket and the folded edges lined up with the outer edge of the blanket layers}.
11: Pin all the way around the entire blanket, leaving a 5 inch space {for an opening to pull the blanket through on one side} on one side.
12: Using a straight stitch and 1/2″ seam allowance {and a WALKING FOOT if you have one} stitch around the entire blanket {don’t forget to leave an opening to pull it through!!}

13: Trim off corners and cut seam allowances down to 1/4″, pull through opening in side. Now that you’re right side out press all the way around, pinning as you go.
c

14: Using about a 3/8″ seam allowance top stitch around the entire blanket.
15: Hand or machine stitch the opening where you pulled through because it will gape a little at the edge.

16: Now you will need to tack or tie your layers together. You cannot quilt it at this point so do not attempt to sew straight line stitches through the layers… even with a lot of pins and a walking foot… it is nearly impossible. You will want to place LOTS of safety pins {safety, not straight… they’ll poke you to death, I know because I tried} all over your blanket {being sure to pin all 3 layers together}.

17: Next, before tacking/tying the quilt together I stiched in the ditch down the center seam, this gives you good stability before you tack/tie the rest.


18: My machine has a little “eyelet” stitch that is perfect for tacking layers together. You can also tie your blanket layers together at this point if you do not wish to machine tack it together. I put an eyelet stitch in each wheel on the trains {and yes, it took a long time but I am very pleased with how it came out}. If you use a floral fabric or something with a pattern you might can outline random flowers with a straight stitch or use a stitch similar to the eyelet to tack the layers together. Once it’s all tacked together you are complete and ready for your picnic!
Here are more images of how to fold/roll the blanket up!


