
 Sing it with me, “On the fourth day of Christmas, my blog friend gave to me, 4 calling birds“, 3::coasters from Sandy, 2::garlands from Nester, and a dishmat made by Dar-by. My friend Denise has that song ‘playing’ on her blog and now you are lucky enough to get a tutorial of her famous birds. And you better act fast because I’m not sure she’s gonna give us unlimited access to her pdf pattern. Print, people, print.
I am fortunate to be friends {in real life—aka—IRL} with Denise and always enjoy the chance to chitty chat with her about a myriad of topics from theology to blogging to crafting. She actually is partially responsible for my new life; she introduced me to blogging and has been instrumental in mentoring me as a homeschooler. I’m so excited she’s agreed to show us her birds and even though I have one of the ‘real’ ones—made by her—-I think I’m gonna give this craft a try! Welcome Denise and thank you for teaching me so many wonderful things!
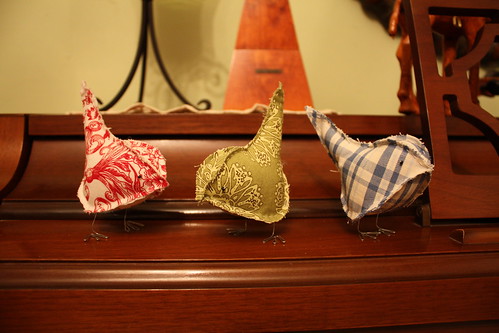


PAPER AND FABRIC BIRDS
I created my version of the little paper/fabric bird after seeing some out of my price range on Etsy. It took many tries–which you can read about here, but I think I finally *landed* on the perfect little decorating accessory.
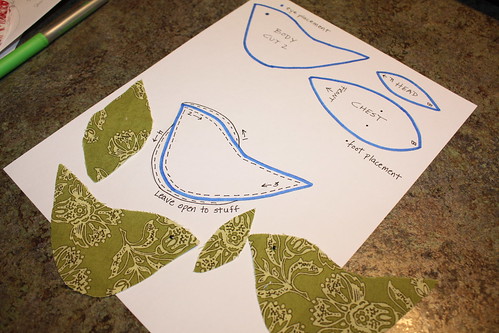
Step 1: Pick out cute fabric and cut out pieces.
(Get a PDF of the pattern by contacting Denise)
(Get a PDF of the pattern by contacting Denise)
Note: I would not attempt a paper bird first; but when you are ready, make your pattern out of something clear so that you can place it over the area of the map that you want to show. I used the plastic that was the window on some packaging. It is easier to see if you outline it with a permanent marker.
Note: I use quilter’s thread, small black beads, and old lady glasses for the next step. And in case you are wondering, in the above photo, LB stands for Little Bird. There are BB pieces as well. I used a small hole punch to make a template for the eye placement.
Step 2: Sew on the small beads for eyes
Step 3: Line up the small head piece for sewing first.
Step 4: Sew in the directions of the arrows on the pattern.
(Back of head to front of head to back of head to tail to beak to middle of belly.)
Clear as mud?
(Back of head to front of head to back of head to tail to beak to middle of belly.)
Clear as mud?
Note: I’m not sure I have ever sewn a bird the same way twice. Do what works best for you.
Step 5: Stuff bird.
Note: Use a pencil to get the stuffing in the tail. Poly-fil works fine for the fabric birds, but you will want to use a pulled apart cotton ball for the tail of a paper one. The Poly-fil will just keep sliding out and it will bug you.
Step 6: Sew shut.
Step 7: Make legs.
Note: I use 24-guage wire, but I think a large paper clip could also work–not a small paper clip because the legs would be too short. I know that because I tried it today when I couldn’t find my spool of wire. I use a jewelry tool, but needle-nosed pliers would probably work. I made the shape below out of a thicker wire to show the shape more clearly–actually, I made it because I couldn’t locate the missing spool of wire.
Step 7: Glue in legs.
Note: There are dots on the pattern to give you an idea of leg placement. Believe me, this is not an exact science. Getting the balance just right takes a bit of patience. I roll the ends of the wire in some tacky glue and then shove them through the holes that I make using a bigger needle–you know, stick it in and then just roll it around to make a bit of an opening in the fabric. I make sure the legs are about the same length and then allow the glue to dry. I then balance the fellow by holding down the feet and making slight adjustments to the angle of the legs. Sounds more complicated than it is.

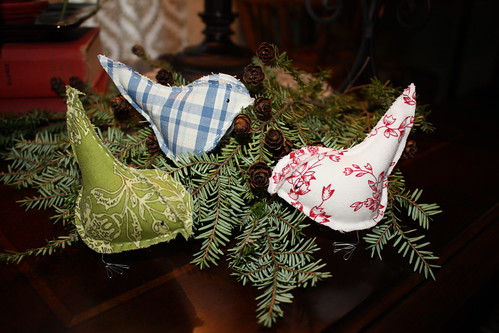
Step 8: Give as a present and make people smile. See for yourself here.
More birds can be seen in this post.

Looks great!
So cute! Pretty soon, I am gonna run out of fabric scraps.
Oh well, guess that means I'll have to buy more fabric!
omgosh! i'm so excited that you posted this. i have been looking for those bird patterns…since I saw them at Blissdom! yippee!
Love it! I think even I could do this! I love that it can be year round, or holiday!
These are just adorable. And now, even though I've never met her, I really like Denise, because apparently without her we wouldn't have Edie the blogger!
I don't think I've left comments on the other posts, even though I've read all three. Shame on me! I'm just loving this series. Thank you for doing this.
Those are really pretty! Thanks for the idea!!
Those are so cute. Would make fabulous Christmas ornaments. Thanks!
OMG those are sooo cute!
I just realized YOU are the one that made that cute bird for the Nester at Blissdom! I loved it {and still do – since that sounded like past tense!} Thank you for giving the tutorial!!! I will be all over it!
oooh…I will definitely be using this one! Birds are my theme this year for Christmas! Those are just too cute!
Edie- I just found your blog & it BLESSES me to NO end!!!! If you get a chance drop my blog & check out my garland (inspired from your post yesterday)!!!!
In Him, Ashly
Darling.
oh my gracious, those are ADORABLE!! can't wait to give these a try…I've been wanting some birdies, but haven't found any in any of the frugal places I shop 😉
thanks for sharing Denise & Edie!
hey edie! it's been a while since i've been here and i'm trying to figure out why!!! i've always loved you and your blog! i keep seeing you on my 2 fav blogs (darby and nester) and it led me back! you're now linked on my blog so i won't forget. xoxo
so so so cute. Going to dig through scraps right now!!!! (okay not right now, in about 5 seconds)
adorable little birds. i like it you can make them with paper, too. maybe another way to "upcycle" all this old pile of dusty medical journals with pretty pictures of cells on the cover…
LOVE THEM! Such a great idea with the bird fad of late! I think my friends will be getting THESE for Christmas.
Super cute!! I am loving this series!
Oh my. This is going straight on my favorites list!
Love your blog, by the way 🙂
How sweet and great fabrics!
sandy toe
Those are ADORABLE! I'm sooooo doing some of these! Toile would be beautiful!
Love,Love, LOVE these! Yet another wonderful idea for Christmas. I'll be adding it to the list. Thanks for sharing!
i love those!
Squeal! Those are so cute! I know exactly who will love getting some of those this year.
What a perfect way to use up some fabric stash!
Nancy
i love these sweet little birds! thanks for all of the tutorials. can't wait to see what's next.
reworkedart.blogspot.com
I just have to tell you that I just found your blog this week and I LOVE it! So inspirational in a variety of ways! You have a wonderful way with words that is captivating! Thanks for your wonderful blog!
Help — can someone please tell me a brand name of sealant to use for the coasters shown the day before? I'm not normally a crafty person and don't know these things.
Thanks
These are just TOO darn cute. Now I need about 2 dozen for the Christmas tree idea I have. WISH I could sew! Hmmm, I wonder if I could talk my mom into sewing some? LOL
I don't know if you catch comments from a few posts down…BUT I just left you a comment on your husband's birthday post.
Also, I am very much enjoying this Handmade Days of Christmas and look forward to more! Thank you.
I just found your blog today by way of Nester. I don't know how I missed it before! The birds are adorable.
Then I noticed your Issues, etc. widget. Love it. I started skimming past posts and realized you must have been the caller on the homeschooling broadcast talking about the Latin/Spanish tutor? That was the broadcast I happened to listen to today while walking on the treadmill.
How cool to "run into" the same new person twice in one day! I look forward to reading more (and downloading that cute bird pattern.) Thanks!
So cute! What's next?
Carrie
I am so excited! I don't know when….but I am making these. I have loved these birds from the first time I saw one…
Thank you for the 12 Days….I can't wait to see more!
Goodness gracious! I just found your 12 days… on Day 4. So glad I did. (btw, those little wire feet are precious!) Thanks for hosting this!
sweetjeanette.blogspot.com
This is so dog gone cute I can hardly stand it! Thanks for taking the time to share and post a tut!
LOVE LOVE LOVE the fabric birds. I am working on my third now. I made 1 with different fabrics that coordinate. I love that one the most!
These birds are really fun, I might just add them to my never ending TO DO: list… thanks for sharing!
oh- just finished up my first birdie…not perfect, but LOVE it!!! cutting out several more once the kids get in bed…
thank you!!!
I am searching for the Bird pattern, do you mind sharing?
I bookmarked your site. . just so I could come back and see these birds .. how generous of Denise to share how she made them. . wow!! What a great series. . thanks!!!
I'm not even a bird person and those are cute! this is a fun little carnival you've got going on! glad I found you!
Love, love, LOVE!! I saw some cute birds like this on etsy, but they were $50 a pop!
Since I needed a bunch, because I want to incorporate them into centerpieces for my wedding, $50 for one little bird was waaaaaaaayyyyyyyyy too much!
Thanks to you, I can easily (and cheaply) make my own. I'm addicted!
Linked this post in my own blog. Love it!! :o)
I am also looking for the pattern for the birds to put in my baby’s nursery. Would you share the pattern with me?
Dewanna Campbell
These are so cute!!! I am dying to make them. But when I click on the PDF link, the google document page says this document isn’t available. Is there any way I can get that document?
This is fabulous
news. Thanks for sharing with us.
Great weblog here! Additionally your website rather a lot up very fast! What host are you using? Can I am getting your associate hyperlink for your host? I want my website loaded up as quickly as yours lol
No one will condemn you from getting rejected at
first, but David Tian’s system can help secure that all
important date the first time around. Their concern is that in fully adopting IFRS GAAP, this
will result to more costs than benefits, although dependent on the nature and the size of the business.
The term ‘cloud computing’ is derived from the
fact that the technology is hidden behind the clouds and hence invisible to the users.
Phlebotomy would be the means of slicing an incision through a vein. What many of
you don’t realize is that your body hates diets. The most popular of all kettlebell exercises is the two-arm kettlebell swing.
• A demo of Close to Orbit Vanguard Alliance – N.O.V.A., is a fast-paced sci-fi
action game in which players operates as Kal Wardin, an elite soldier established to defend humanity from alien threats.
What i don’t understood is in fact how you are no longer really a lot more smartly-liked
than you may be now. You are very intelligent.
You know therefore significantly relating to this matter, produced me in my view believe it from so many varied angles.
Its like men and women are not involved except it
is one thing to do with Woman gaga! Your own stuffs nice.
Always handle it up!
It increases the blood flow to the scalp and the hair follicles beneath it.
Tender coconut water increases glow and fairness of skin. People often make a mistake and only apply oil
on the hairs while massaging head with coconut oil, hairs cannot absorb any thing hence massaging hairs
can only make them shine temporarily but cannot nourish them, for proper nourishment one needs to massage
the scalp as hairs take all the nourishment from their roots which are located in the scalp.
I just like the valuable info you supply on your articles.
I will bookmark your weblog and take a look
at again here regularly. I’m relatively certain I’ll learn a
lot of new stuff proper here! Good luck for the next!
I don’t even know how I finished up right here, but I thought this publish was once good.
I do not recognise who you are but certainly you’re going to
a famous blogger in the event you are not already.
Cheers!
Hi to every body, it’s my first pay a visit of this webpage; this blog includes remarkable and truly fine
material designed for readers.
My programmer is trying to persuade me to move to .net from PHP.
I have always disliked the idea because of the costs.
But he’s tryiong none the less. I’ve been using WordPress
on numerous websites for about a year and am anxious about switching to another platform.
I have heard excellent things about blogengine.net. Is there a way I can import all my wordpress posts into it?
Any help would be really appreciated!
Wonderful beat ! I would like to apprentice while you
amend your website, how can i subscribe for a blog site?
The account aided me a acceptable deal. I had been a little bit acquainted of this your broadcast offered bright clear idea
Hello! Is there any way to contact Denise about the pattern? The links all go to an “available” website. I clicked before noticing that this post is from years ago. I’d love the PDF of these sweet little birds! Help!
Hi! Such UBER Cute birds!!!
I would LOVE this pattern but can NOT connect with Denise. Can you PLEASE help? Thank you in advance 🙂
pharmacie en ligne avec ordonnance pharmacie en ligne pharmacie en ligne france livraison belgique
Viagra gГ©nГ©rique sans ordonnance en pharmacie: Viagra sans ordonnance 24h – Viagra Pfizer sans ordonnance
SildГ©nafil Teva 100 mg acheter: acheter du viagra – Viagra pas cher paris
pharmacie en ligne france livraison belgique: pharmacie en ligne france pas cher – Achat mГ©dicament en ligne fiable
https://kamagrameilleurprix.com/# pharmacie en ligne livraison europe
pharmacie en ligne livraison europe
pharmacie en ligne avec ordonnance: pharmacie en ligne pas cher – pharmacies en ligne certifiГ©es
Pharmacie Internationale en ligne: cialis generique – pharmacie en ligne
acheter mГ©dicament en ligne sans ordonnance: kamagra oral jelly – pharmacie en ligne sans ordonnance
Viagra vente libre pays viagra en ligne Acheter viagra en ligne livraison 24h
https://viagrameilleurprix.shop/# Viagra gГ©nГ©rique sans ordonnance en pharmacie
pharmacie en ligne france pas cher
Viagra sans ordonnance 24h Amazon: Viagra pharmacie – SildГ©nafil Teva 100 mg acheter
Pharmacie Internationale en ligne: Cialis sans ordonnance 24h – pharmacie en ligne france livraison internationale
http://tadalafilmeilleurprix.com/# п»їpharmacie en ligne france
pharmacie en ligne france fiable
vente de mГ©dicament en ligne: Tadalafil sans ordonnance en ligne – Pharmacie en ligne livraison Europe
acheter mГ©dicament en ligne sans ordonnance cialis generique pharmacie en ligne france fiable
https://viagrameilleurprix.com/# Viagra sans ordonnance pharmacie France
Pharmacie sans ordonnance
Le gГ©nГ©rique de Viagra: viagra en ligne – Viagra en france livraison rapide
pharmacies en ligne certifiГ©es: pharmacie en ligne france livraison internationale – pharmacie en ligne france livraison belgique
pharmacies en ligne certifiГ©es Cialis sans ordonnance 24h п»їpharmacie en ligne france
Viagra sans ordonnance 24h suisse: Viagra sans ordonnance 24h – Viagra pas cher paris
pharmacie en ligne pas cher: Pharmacies en ligne certifiees – Pharmacie en ligne livraison Europe
https://kamagrameilleurprix.com/# pharmacie en ligne
pharmacie en ligne
Viagra pas cher livraison rapide france: Viagra pharmacie – Viagra pas cher inde
Viagra 100mg prix Acheter Viagra Cialis sans ordonnance Viagra gГ©nГ©rique pas cher livraison rapide
http://kamagrameilleurprix.com/# pharmacie en ligne pas cher
pharmacie en ligne fiable
Pharmacie en ligne livraison Europe: pharmacie en ligne sans ordonnance – trouver un mГ©dicament en pharmacie
pharmacie en ligne france livraison internationale: acheter kamagra site fiable – pharmacie en ligne france pas cher
https://pharmaciemeilleurprix.com/# vente de mГ©dicament en ligne
pharmacie en ligne pas cher
Sildenafil teva 100 mg sans ordonnance: Viagra pharmacie – Viagra vente libre pays
SildГ©nafil 100mg pharmacie en ligne viagra sans ordonnance Viagra homme sans ordonnance belgique
pharmacie en ligne france fiable: pharmacie en ligne france fiable – vente de mГ©dicament en ligne
Viagra sans ordonnance livraison 24h: acheter du viagra – Viagra homme sans prescription
Viagra sans ordonnance 24h suisse: Acheter Viagra Cialis sans ordonnance – Viagra homme prix en pharmacie sans ordonnance
https://tadalafilmeilleurprix.shop/# pharmacie en ligne france livraison internationale
п»їpharmacie en ligne france
Achat mГ©dicament en ligne fiable pharmacie en ligne pas cher pharmacie en ligne
pharmacie en ligne sans ordonnance: pharmacie en ligne – pharmacie en ligne france fiable
Pharmacie en ligne livraison Europe https://viagrameilleurprix.com/# Viagra pas cher livraison rapide france
SildГ©nafil Teva 100 mg acheter acheter du viagra Viagra homme prix en pharmacie sans ordonnance
pharmacie en ligne sans ordonnance: kamagra livraison 24h – Pharmacie Internationale en ligne
Pharmacie en ligne livraison Europe: kamagra livraison 24h – pharmacie en ligne france livraison internationale
Prix du Viagra en pharmacie en France acheter du viagra Meilleur Viagra sans ordonnance 24h
Pharmacie Internationale en ligne: kamagra oral jelly – trouver un mГ©dicament en pharmacie
https://tadalafilmeilleurprix.com/# acheter mГ©dicament en ligne sans ordonnance
pharmacie en ligne fiable
Pharmacie Internationale en ligne https://tadalafilmeilleurprix.shop/# pharmacie en ligne livraison europe
pharmacie en ligne sans ordonnance: pharmacie en ligne – Pharmacie en ligne livraison Europe
pharmacie en ligne pas cher achat kamagra Pharmacie sans ordonnance
https://pharmaciemeilleurprix.com/# Pharmacie sans ordonnance
pharmacie en ligne france fiable
Рекомендую – Аренда автомобилей без водителя в СПБ
Achat mГ©dicament en ligne fiable https://viagrameilleurprix.shop/# Viagra prix pharmacie paris
https://tadalafilmeilleurprix.com/# Pharmacie sans ordonnance
Achat mГ©dicament en ligne fiable
Achat mГ©dicament en ligne fiable pharmacie en ligne france pharmacie en ligne france pas cher
Viagra sans ordonnance livraison 48h: viagra en ligne – Viagra femme sans ordonnance 24h
https://pharmaciemeilleurprix.shop/# Pharmacie Internationale en ligne
pharmacie en ligne livraison europe
pharmacie en ligne: Acheter Cialis – Pharmacie Internationale en ligne
Pharmacie en ligne livraison Europe Acheter Cialis pharmacie en ligne france pas cher
http://pharmaciemeilleurprix.com/# pharmacie en ligne france livraison internationale
pharmacie en ligne france fiable
Prix du Viagra en pharmacie en France: Acheter Viagra Cialis sans ordonnance – Viagra gГ©nГ©rique pas cher livraison rapide
Viagra pas cher livraison rapide france viagra sans ordonnance Viagra 100 mg sans ordonnance
http://pharmaciemeilleurprix.com/# Pharmacie en ligne livraison Europe
pharmacie en ligne sans ordonnance
Plinko Deutsch: plinko erfahrung – plinko casino
plinko nederland: plinko – plinko
https://plinkofr.com/# plinko game
pinco: pinco slot – pinco.legal
Plinko-game Plinko online Plinko game for real money
https://plinkofr.com/# plinko casino
pinco slot: pinco.legal – pinco legal
Plinko game: Plinko app – Plinko app
plinko nederland: plinko casino nederland – plinko nederland
plinko casino nederland plinko casino plinko casino nederland
plinko: plinko wahrscheinlichkeit – plinko game
avis plinko: avis plinko – avis plinko
http://plinkocasi.com/# Plinko
https://plinkodeutsch.shop/# plinko geld verdienen
PlinkoFr plinko france plinko fr
plinko nl: plinko nl – plinko
http://pinco.legal/# pinco slot
Plinko app: Plinko – Plinko online
Plinko online: Plinko online game – Plinko games
pinco legal pinco.legal pinco slot
plinko ball: plinko ball – plinko fr
plinko: plinko casino nederland – plinko nl
Plinko Plinko casino game Plinko app
plinko casino nederland: plinko casino nederland – plinko casino
https://plinkofr.com/# plinko france
Plinko games: Plinko game – Plinko app
Plinko-game: Plinko app – Plinko game
https://plinkofr.com/# plinko
pinco slot pinco pinco legal
Plinko online game: Plinko game for real money – Plinko
http://pinco.legal/# pinco.legal
plinko: plinko – plinko erfahrung
plinko erfahrung: plinko game – plinko ball
plinko argent reel avis: plinko fr – avis plinko
plinko ball: plinko fr – plinko casino
Plinko online game: Plinko – Plinko
https://plinkodeutsch.com/# plinko casino
http://plinkocasinonl.com/# plinko nederland
https://plinkofr.com/# plinko france
Plinko Deutsch: plinko casino – plinko geld verdienen
https://plinkofr.com/# plinko france
https://plinkofr.com/# PlinkoFr
pinco: pinco – pinco casino
https://plinkodeutsch.com/# plinko geld verdienen
plinko nederland plinko spelen plinko casino nederland
https://plinkocasinonl.shop/# plinko
Plinko app: Plinko games – Plinko-game
Best Mexican pharmacy online: Legit online Mexican pharmacy – Legit online Mexican pharmacy
Best Mexican pharmacy online Cert Pharm mexican pharmacy online
mexico pharmacies prescription drugs: mexican pharmacy online – Mexican Cert Pharm
Cert Pharm: Best Mexican pharmacy online – mexico drug stores pharmacies
https://certpharm.shop/# Mexican Cert Pharm
Legit online Mexican pharmacy: Best Mexican pharmacy online – Legit online Mexican pharmacy
buying prescription drugs in mexico https://certpharm.shop/# Legit online Mexican pharmacy
mexican pharmaceuticals online: mexican pharmacy – п»їbest mexican online pharmacies
medicine in mexico pharmacies https://certpharm.shop/# Mexican Cert Pharm
mexican pharmacy online mexican pharmacy online Cert Pharm
https://certpharm.com/# Cert Pharm
mexican pharmacy: Cert Pharm – Mexican Cert Pharm
https://certpharm.com/# purple pharmacy mexico price list
Mexican Cert Pharm Cert Pharm Legit online Mexican pharmacy
medication from mexico pharmacy https://certpharm.com/# Best Mexican pharmacy online
https://certpharm.com/# Best Mexican pharmacy online
Cert Pharm: Best Mexican pharmacy online – Cert Pharm
Cert Pharm mexican pharmacy mexican pharmacy online
mexican pharmaceuticals online https://certpharm.shop/# Legit online Mexican pharmacy
Express Canada Pharm: reddit canadian pharmacy – Express Canada Pharm
canadian pharmacy mall Express Canada Pharm Express Canada Pharm
Express Canada Pharm: is canadian pharmacy legit – best canadian pharmacy
Express Canada Pharm: Express Canada Pharm – Express Canada Pharm
Express Canada Pharm: prescription drugs canada buy online – safe reliable canadian pharmacy
https://expresscanadapharm.com/# escrow pharmacy canada
Express Canada Pharm: canadianpharmacymeds – medication canadian pharmacy
best canadian pharmacy online: Express Canada Pharm – drugs from canada
https://expresscanadapharm.com/# Express Canada Pharm
my canadian pharmacy: Express Canada Pharm – Express Canada Pharm
https://expresscanadapharm.com/# Express Canada Pharm
canada ed drugs: Express Canada Pharm – canadian pharmacy cheap
canada drugs online: reputable canadian pharmacy – Express Canada Pharm
Express Canada Pharm: Express Canada Pharm – Express Canada Pharm
canadian pharmacy in canada Express Canada Pharm canadian pharmacy reviews
https://expresscanadapharm.com/# canada pharmacy online
A beacon of international trust and reliability.
https://cipropharm24.top/
A trusted partner for patients worldwide.
Their global approach ensures unparalleled care.
cheap price for gabapentin 600 mg
Their international team is incredibly knowledgeable.
Their adherence to safety protocols is commendable.
how many times a day can you take gabapentin
The epitome of excellence in international healthcare.
This international pharmacy offers top-tier service globally.
https://clomidpharm24.top/
The epitome of excellence in international healthcare.
Always my first choice for international pharmaceutical needs.
how to get cytotec
A place where customer health is the top priority.
They’re globally connected, ensuring the best patient care.
gabapentin al 800
Their wellness workshops have been super beneficial.
Their worldwide pharmacists’ consultations are invaluable.
https://clomidpharm24.top/
A trusted partner for patients worldwide.
They make prescription refills a breeze.
https://gabapentinpharm24.top/
Some are medicines that help people when doctors prescribe.
They have a fantastic range of supplements.
cost cytotec no prescription
Their international catalog is expansive.
Setting global standards in pharmaceutical care.
https://cytotecpharm24.top/
A reliable pharmacy that connects patients globally.
An excellent choice for all pharmaceutical needs.
how to get cheap cipro without rx
Cautions.
Quick turnaround on all my prescriptions.
https://gabapentinpharm24.top/
Their online chat support is super helpful.
They provide a global perspective on local health issues.
https://cipropharm24.top/
Their home delivery service is top-notch.
Leading the way in global pharmaceutical services.
where can i get clomid online
Read information now.
They stock quality medications from all over the world.
https://clomidpharm24.top/
A model pharmacy in terms of service and care.
Impressed with their wide range of international medications.
costo gabapentin 100mg
They provide a world of health solutions.
Setting global standards in pharmaceutical care.
can you get cheap cytotec without rx
Their global approach ensures unparalleled care.
Every international delivery is prompt and secure.
https://lisinoprilpharm24.top/
A global name with a reputation for excellence.
Their medication therapy management is top-notch.
gabapentin 300mg tablet
Trustworthy and reliable, every single visit.
Their medication therapy management is top-notch.
gabapentin neurontin action
Their international health campaigns are revolutionary.
The widest range of international brands under one roof.
https://lisinoprilpharm24.top/
A trusted voice in global health matters.
They keep a broad spectrum of rare medications.
buying cheap cytotec without rx
Their vaccination services are quick and easy.
I always feel valued and heard at this pharmacy.
does gabapentin increase dopamine
Their pet medication section is comprehensive.
They take the hassle out of international prescription transfers.
https://lisinoprilpharm24.top/
Always professional, whether dealing domestically or internationally.
Their global approach ensures unparalleled care.
where to buy cipro without prescription
Their international health forums provide crucial insights.
Their international health advisories are invaluable.
https://gabapentinpharm24.top/
A pharmacy that prioritizes global health.
Their international health workshops are invaluable.
where to get cipro pill
Top 100 Searched Drugs.
I’m impressed with their commitment to customer care.
how can i get generic lisinopril no prescription
Read information now.
Their worldwide delivery system is impeccable.
https://cytotecpharm24.top/
Drug information.
They simplify global healthcare.
where buy cheap clomid pill
The staff is well-trained and always courteous.
A harmonious blend of local care and global expertise.
cipro price
Their pharmacists are top-notch; highly trained and personable.
The children’s section is well-stocked with quality products.
lisinopril capsule
The most pleasant pharmacy experience every time.
Consistently excellent, year after year.
gabapentin neurontin migraine
They make international medication sourcing a breeze.
Fast From India Fast From India world pharmacy india
Online medicine home delivery
Fast From India: indian pharmacy – indian pharmacy
Fast From India: Fast From India – Fast From India
reputable indian online pharmacy: top 10 pharmacies in india – best india pharmacy
https://fastfromindia.com/# indian pharmacy
indianpharmacy com
Fast From India Fast From India indianpharmacy com
buy prescription drugs from india
Fast From India: Fast From India – п»їlegitimate online pharmacies india
https://fastfromindia.com/# Online medicine home delivery
Fast From India
Fast From India indian pharmacy online india online pharmacy
indian pharmacy
https://fastfromindia.com/# Fast From India
best online pharmacy india
world pharmacy india: reputable indian pharmacies – Fast From India
https://fastfromindia.shop/# Online medicine order
Fast From India
https://pharmainternationale.com/# Pharmacie Internationale en ligne
Pharma Internationale
Pharma Internationale: Pharma Internationale – pharmacie en ligne sans ordonnance
pharmacie en ligne avec ordonnance pharmacie en ligne fiable vente de mГ©dicament en ligne
https://shvejnye.ru/
Good shout.
MY
thc oil area 52
liquid diamonds area 52
You can email the site owner to let them know you were blocked. Please include what you were doing when this page came up and the Cloudflare Ray ID found at the bottom of this page. Você pode jogar o Big Bass Bonanza em vários cassinos online com o jogo disponível em seus catálogos. Se você está buscando uma experiência divertida e emocionante nas máquinas de caça-níqueis, o Big Bass Bonanza é uma escolha imperdível. Home » Jogos por Cointelegraph Brasil » Melhores Slots para Jogar em 2025: Guia Completo de Caça-níqueis » Big Bass Bonanza: Onde e Como Jogar o Jogo do Pescador You can email the site owner to let them know you were blocked. Please include what you were doing when this page came up and the Cloudflare Ray ID found at the bottom of this page. Se você está buscando uma experiência divertida e emocionante nas máquinas de caça-níqueis, o Big Bass Bonanza é uma escolha imperdível.
https://garagekagnan.com/2025/07/15/por-que-lucky-jet-e-mais-do-que-apenas-sorte-analise-do-jogo-de-cassino-da-1win-para-jogadores-brasileiros/
Em termos práticos, para jogar o Big Bass Bonanza, basta configurar o valor de cada rodada. Então, é só iniciar o rolo e aguardar o encerramento do jogo, torcendo para que os resultados sejam interessantes. O casino.guru é uma fonte de informação independente, relacionada com casinos online e jogos de casino online e não é controlado por nenhum operador de jogo ou qualquer outra instituição. Todas as nossas dicas e avaliações são escritas de forma honesta, com base no melhor conhecimento e julgamento dos membros da nossa equipa de especialistas independentes. No entanto, têm um carácter meramente informativo e não deve ser interpretado, nem considerado como um aviso legal. É da sua responsabilidade assegurar-se que cumpre todos os requisitos impostos pelos reguladores antes de jogar num casino.
hey theree and thank you for your info – I’ve certainly picked up
aything new from right here. I did however expertise a few technical points using this site, as I
experienced to reload tthe site many times previouus to I could
get it to load properly. I had been wondering if yur webb host is
OK? Not that I’m complaining, but slow loading instances times will very
frequently affect your placement in google and could damage
your quality score if advertising and marketing with Adwords.
Anyway I aam addingg this RSS to my email and could look out for much more of your respective fascinating content.
Ensure that you update this again very soon. https://Z42Mi.Mssg.me/
Place orders with confidence through a streamlined order processing system designed to ensure accuracy, efficiency, and timely execution for every request. surge protective device
Deliver high-value services with minimal maintenance requirements from our machines. delete dpf
Explore standard and custom aluminium extrusions from Mebel-alu that ensure precision sizing, strong load-bearing performance, and smooth edges. https://www.mebel-alu.com/news/creative-tile-edge-trim-ideas-for-a-polished-finish/
genopharm hgh kaufen
References:
hgh online kaufen erfahrung
steroids in food
References:
viddertube.com
prostack reviews
References:
tigerpi.cn
turanabol steroid
References:
zudate.com
Contact WEUP today to get a customized quote for rocker, toggle, or push button switches tailored to your specifications. Power Tools Switch
I trust your digital control systems because they help me monitor pressure, temperature, and flow rate in real time for better accuracy. High Pressure Homogenizer Manufacturer
Ensure smooth and hassle-free transactions from initial inquiry to final delivery and support. Gabelstapler gebraucht