

Welcome to the preview of the 12 Days of Handmade Christmas Tutorials! Join me next Sunday November 1 and meet one of my favorite {new to me} bloggers. It’s a secret until then but you’re gonna love her. To give you a taste of what’s in store, I thought I’d do a tutorial on how to make sweater stockings from old sweaters.
I first saw this lovely idea at an antique store downtown. There are so many things to love about the sweater stocking. You can use old/sentimental/colorful sweaters to make the most lovely and meaningful Christmas stockings. And then embellish them with almost anything you like. There are no rules and no two need be alike.
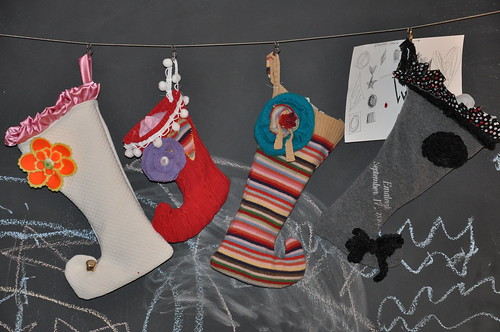
Start with a stocking whose design you love. I used this one {for the large size}
that I bought at the antique store. Just find a stocking you love and use it as a template.
This particular sweater was one of my favorites {from Gap} for several years and then I accidentally dried it. Its’ colorful stripes are perfect for a stocking.
This particular sweater was one of my favorites {from Gap} for several years and then I accidentally dried it. Its’ colorful stripes are perfect for a stocking.
1. Turn the sweater wrong side out and use the band of the sweater as the top of the stocking. Lay your template down and use a rotary cutter to cut around it leaving about 3/4inch of fabric all the way around for the seam allowance.

2. Sew the stocking {leaving the top open, of course} using about a 1/2 inch seam.

3. The stocking will then look like this. Turn it right side out……

and let one of your sweat shop helpers demonstrate its’ loveliness.

4. Embellish ’til your hearts’ content. The girls and I used felt flower pins and initials for this one. We bought these wood letters at Hobby Lobby and then spray painted them, drilled a hole in the corner and then hung them from the stocking. I used a cut piece of the arm band of the sweater as a ‘hanger’ for the stocking—-but you could use any ribbon or fabric.

Your helper will then proceed to find every old sweater she possibly can

and stockings will begin to take over your life.

She may then have the brilliant idea of using her sentimental baby blanket

to make another gorgeous beauty.

Warning: This activity is highly addictive and may result in a VERY cold winter. Hope you enjoyed and let us know if you make some stockings! No children were harmed in the making of this tutorial.
This is a teaser/sampler of what you can expect during the 12 days of handmade Christmas tutorials that begins next Sunday November 1. I’d love it if you shared this adorable little button on your blog. {Thank you Darcy}.

Any contributors to the ’12 Days’ who haven’t emailed me lately with a post update, please do so. I’m trying to stay kind of organized but it’s not my strong suit.
Any contributors to the ’12 Days’ who haven’t emailed me lately with a post update, please do so. I’m trying to stay kind of organized but it’s not my strong suit.
Love to all and happy crafting! Visit Kimba’s and Kim’s and Kris‘s sites for other fun DIY projects.
Visit here to for the 12 Days of Christmas Tutorials.
